• Home
  • Suggest A Craft
  • DIY Newsletter

Craft Gossip

The largest independent craft review site since 2007

  • About CraftGossip
  • Our Network
    • Bath & Body Crafts
    • Candle Making Ideas
    • Crochet Ideas
    • Cross Stitch
    • Edible Crafts
    • Felting Patterns
    • Glass Art
    • Home & Garden Ideas
    • Indie Crafts
    • Jewelry Making
    • Kids Crafts
    • Knitting Patterns
    • Lesson Plans
    • Needlework
    • Party Ideas
    • Polymer Clay
    • Quilting Ideas
    • Recycled Crafts
    • Scrapbooking
    • Sewing Patterns
    • Card Making
    • DIY Weddings
    • Not Craft Ideas
  • Giveaways
  • Roundups
  • Store
  • Search

DIY – Paper Napkin Transfer Candle

January 10, 2014 by Shellie Wilson

KerzenverzierenLebenslustiger22

Adding images from a paper napkin to a candle is an easy and fun way to create unique and personalized candles. With this technique, you can transfer any image or design from a paper napkin onto a candle and create a beautiful and embellished candle that is perfect for gift-giving or adding a romantic touch to any room.  see the tutorial here –this Candle Transfer Project.


To get started, you’ll need a few supplies:

A white pillar candle
A printed paper napkin with your desired design or image
Wax paper
A hairdryer
Scissors
A paintbrush
Mod Podge or other decoupage glue
Here’s how to create your own embellished transfer candle:

Cut out the image or design from your printed paper napkin. Make sure it is the right size to fit on your candle.

Place a sheet of wax paper on your work surface to protect it from glue and wax.

Apply a thin layer of Mod Podge or other decoupage glue to the area of the candle where you want to place the image.

Carefully place the image on the candle, making sure it is straight and centered. Smooth out any wrinkles or bubbles with your fingers.

Use a paintbrush to apply a layer of Mod Podge or other decoupage glue over the top of the image. Be sure to cover the entire surface of the image and the surrounding area.

Use a hairdryer on a low setting to dry the Mod Podge or other decoupage glue. Be careful not to melt the candle wax.

Once the Mod Podge or other decoupage glue is dry, carefully peel away the wax paper. The image should be transferred onto the candle.

If necessary, use a paintbrush to touch up any areas where the image did not transfer completely.

Allow the candle to dry completely before using or displaying it.

By following these simple steps, you can create your own personalized and embellished transfer candles using printed paper napkins. Whether you’re giving them as gifts or using them to create a romantic atmosphere at home, these candles are sure to impress


Read These Next

  • 13 Ways to Embellish Boring Candles
  • 12 DIY Candles You Can Make At Home Using Ice
«
»

Have you read?

Bookmark Cross Stitch Patterns

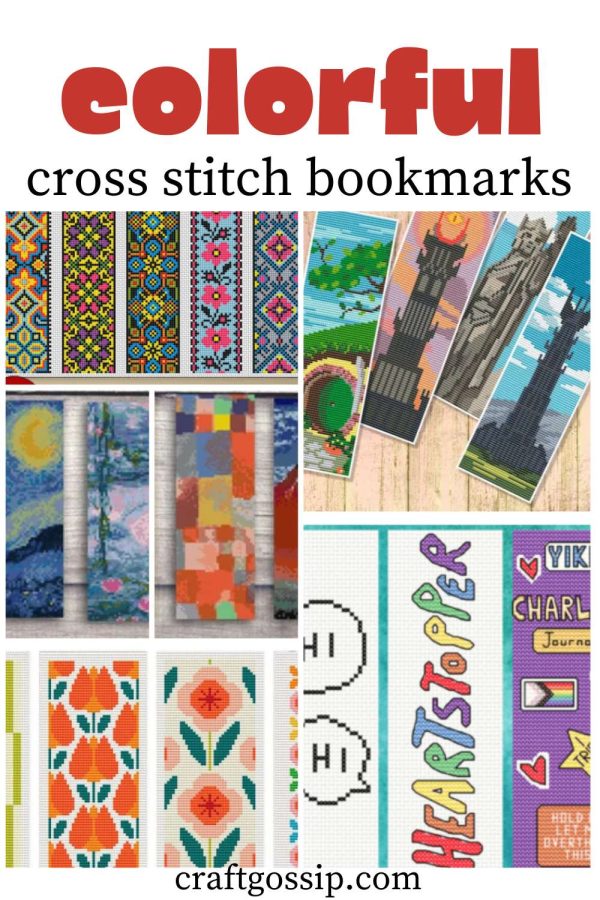
It seems like there’s no end to the available options when it comes to cross stitch bookmarks, which is a good thing because they’re perennially popular to stitch as well. This time I thought I’d share some colorful cross stitch bookmarks to get you ready for the new school year or to make meeting your reading goals a little more fun. 

I love these retro floral designs from The Stitch Patterns. This set of four patterns is rated as very easy, and each bookmark measures 2.5 by 6 inches (or 6.35 by 15.25 cm) on 14 count fabric. 

These cute ones that look like mosaic tile would also be fun to stitch. This set includes five designs from EmbroSTyle Designs, and they call them folk art but they mostly look like old mosaics to me. Either way, the bookmarks are 25 by 101 stitches, and to stitch the full set uses 12 colors. 

If you’re looking for more of a challenge, you can stitch up a work of art with this set of 16 bookmarks designed to look like famous paintings. Stitch some sunflowers or a great wave or a starry night. Most of these are between 14 and 20 colors (the great wave is only 8) and the bookmarks are totally covered with stitching at a count of 35 by 100 stitches. Grab this set from Sunset and Sea Design.

Or how about some bookmarks inspired by books (or by movies inspired by books)? This set of Lord of the Rings bookmarks includes four landmarks from the books/movies. Each one is 35 by 115 stitches and uses between 8 and 17 colors. You can find them at byCountryMagicStitch.

These don’t quite all fit the description of being colorful bookmarks to cross stitch, but a few of them do, and speaking of book-themed bookmarks I had to share this set from Mama Geek inspired by Heartstopper. There are seven designs in all that should be quite familiar to readers (or viewers of the series). 

25 Christmas Bookmark Cross-stitch Patterns [Cross-Stitch]

25 Floral Bookmark Cross Stitch Patterns

RSS More Articles

  • Bookmark Cross Stitch Patterns
  • FREE Summer Vacation Die Cut Files to Download
  • Knit a Linen Stitch Hot Pad
  • Agnes Sweater Vest PDF Crochet
  • Coldplay Caught on Camera?! This Free Coloring Page Will Leave You in Stitches!
  • Democratic Republic of the Congo for Kids
  • Primrose and Bee Punch Needle Pattern from DMC
  • Striped Ripple Afghan- Free Crochet Pattern
  • Knitting Pattern Review: Sabai Top by PaulaStrickt
  • Book Review – Capture Your Own Life with Collage Quilting

Pick Your Blog

  • Sewing
  • Knitting
  • Quilting
  • Crochet
  • Home & Garden
  • Recycled Crafts
  • Scrapbooking
  • Card Making
  • Polymer Clay
  • Cross-Stitch
  • Edible Crafts
  • Felting
  • Glass Art
  • Indie Crafts
  • Kids Crafts
  • Jewelry Making
  • Lesson Plans
  • Needlework
  • Bath & Body
  • Party Ideas
  • Candle Making
  • DIY Weddings
  • Not Craft
  • Free Craft Projects

Copyright © 2025 · CraftGossip | Start Here | Contact Us | Link to Us | Your Editors | Privacy and affiliate policy