• Home
  • Suggest A DIY
  • DIY Newsletter

Craft Gossip

Independent craft blog since 2007

  • About CraftGossip
  • Our Network
    • Bath & Body Crafts
    • Candle Making Ideas
    • Crochet Ideas
    • Cross Stitch
    • Edible Crafts
    • Felting Patterns
    • Glass Art
    • Home & Garden Ideas
    • Indie Crafts
    • Jewelry Making
    • Kids Crafts
    • Knitting Patterns
    • Lesson Plans
    • Needlework
    • Party Ideas
    • Polymer Clay
    • Quilting Ideas
    • Recycled Crafts
    • Scrapbooking
    • Sewing Patterns
    • Card Making
    • DIY Weddings
    • Not Craft Ideas
  • Giveaways
  • Roundups
  • Store
  • Search

DIY Punch Bowl Pumpkin – Budget-Friendly Fall and Halloween Décor

September 24, 2025 by Shellie Wilson

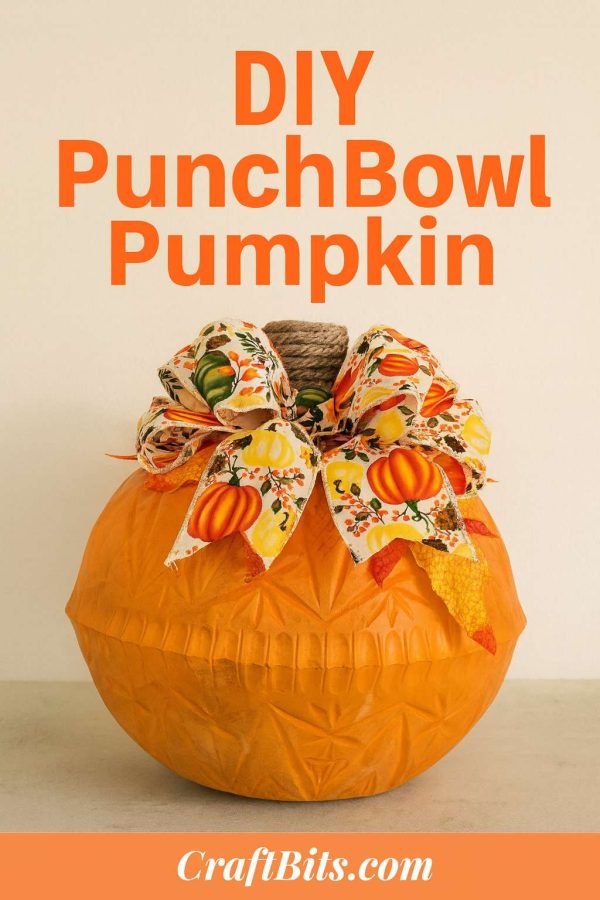
Looking for a clever way to decorate your home for fall without breaking the bank? Our sister site, CraftBits, has come up with the most creative solution—a pumpkin made from Dollar Tree punch bowls!

This DIY Punch Bowl Pumpkin tutorial is the definition of budget-friendly seasonal décor. By gluing two inexpensive plastic punch bowls together and giving them a coat of chalk paint, you can create a large, eye-catching pumpkin that looks just as good (if not better!) than pricey store-bought decorations. Add a painted stem, some fall leaves, or twinkle lights, and you’ve got yourself a centerpiece that works for both Halloween and Thanksgiving.

What I love most about this project is its versatility. You can paint your pumpkin white for that modern farmhouse vibe, go classic orange for Halloween charm, or even try metallics for a chic harvest display. Plus, the size makes it perfect for porches, mantels, or even a festive entryway.

The step-by-step tutorial on CraftBits makes it simple to follow along—even if you’re not typically a DIY crafter. This is a quick weekend project that gives you big decorating impact for very little cost.

If you’re craving unique and affordable fall décor, you’ll want to give this a try. Grab a couple of punch bowls and some paint, and you’ll have your own fabulous DIY pumpkin ready to display in no time!

Check out the full tutorial here: How to Make a Pumpkin from Punch Bowls – CraftBits

Read These Next

  • 35 Creative Ways to Make Bowls from Recycled…
  • 40 Recycled Crafts For Adults That Turn Trash Into Treasure
«
»

Have you read?

Easy Patriotic Mason Jar Cricut Craft for Summer Decorating

Mason jars really do earn their keep in the craft room, don’t they? One minute they’re holding buttons, the next they’re filled with flowers, fairy lights, paintbrushes, or the random collection of pens that somehow migrates from every drawer in the house.

This Stars & Stripes 4th of July Mason Jar Cricut Craft from CraftBits is a simple red, white, and blue project that turns plain pint-size mason jars into festive patriotic decorations. It uses paint, white vinyl, a Cricut machine, and a stars-and-stripes SVG file to create a clean, bold design that works beautifully for 4th of July table decor, patriotic porch styling, summer BBQs, Memorial Day, Labor Day, and Veterans Day displays.

You can find the full tutorial here: Stars & Stripes 4th Of July Mason Jar – Cricut Craft.

What I like about this project is that it looks polished without being overly complicated. The jars are painted red and blue, then finished with white vinyl decals cut using a Cricut. The tutorial uses a Cricut machine with a fine point blade, standard grip mat, premium white vinyl, transfer tape, weeding tool, paint, clear glaze, and two pint-size mason jars with at least one smooth side.

The instructions walk you through painting the jars with 2–3 coats, sealing them with clear glaze, uploading the SVG into Cricut Design Space, resizing the design, cutting and weeding the vinyl, applying it with transfer tape, and sealing again before filling the jars with flowers, flags, or other embellishments.

These jars would be adorable lined up down the centre of a picnic table, tucked into a porch display, or grouped on a mantel with mini flags and battery candles. I especially like the idea of using faux white flowers so they can be packed away and reused next year — because let’s be honest, holiday decorating is much easier when half the job is already sitting in a labelled storage tub.

If you are already planning a front porch refresh, this project pairs nicely with our 15 DIY 4th of July porch decor ideas, which includes mason jar accents, patriotic wreaths, painted rocks, custom doormats, and budget-friendly red, white, and blue styling ideas. CraftGossip also notes that mason jars work beautifully for porch tables, windowsills, drinks stations, battery candles, fairy lights, flags, and wrapped cutlery.

A few handy tips before you start: make sure your jars are clean and dry before painting, let every coat cure properly, and use the smoothest side of the jar for your vinyl. Raised lettering on mason jars can make vinyl placement a bit fiddly, and nobody needs to be arguing with transfer tape the night before guests arrive.

For supplies, this is a natural place to mention a Cricut machine, white permanent vinyl, transfer tape, weeding tools, mason jars, clear spray glaze, and red and blue craft paint. Amazon works well for general Cricut supplies and mason jars, while Cricut-branded materials or vinyl bundles are a helpful affiliate fit if you’re turning this into a shopping-supported post. A small Cricut scraper or spatula is also worth having nearby because it helps the vinyl transfer cleanly without bubbles.

You could also change the look depending on your decorating style. Use navy and burgundy paint for a more vintage Americana look, bright red and royal blue for a party table, or chalk paint if you like a softer farmhouse finish. Add twine around the rim, tuck in mini flags, fill them with sparklers for display only, or use them as utensil holders for a backyard BBQ.

This is a lovely beginner Cricut project because it uses a simple vinyl application on a small surface. It gives you a finished project that looks impressive, but it doesn’t require a huge material list or complicated layering. And if you’ve been saving jars because “they might be useful one day,” congratulations — one day has officially arrived.

RSS More Articles

  • How To Sew A Tube Top: 10 Easy Tube Top Sewing Tutorials
  • Tropical Bird Crafts and Learning Activities
  • 12 Camping Quilt Projects for Campers, Cabins, and Glamping Fans
  • 15 Bind-Off Methods Every Knitter Should Know And When To Use Them
  • Star Wars: The Official Crochet Pattern Book Review – Amigurumi Patterns for Galaxy-Loving Crafters
  • 10 Recipes You Can Make In A Dutch Oven Loaf Pan
  • 12 Summer Sea Scene Card Ideas
  • Lincraft To Close Its Remaining Storefronts Across Australia And New Zealand
  • Pretty Tank Top Knitting Patterns to Keep You Cool
  • Seagull Cross Stitch Patterns

Pick Your Blog

  • Sewing
  • Knitting
  • Quilting
  • Crochet
  • Home & Garden
  • Recycled Crafts
  • Scrapbooking
  • Card Making
  • Polymer Clay
  • Cross-Stitch
  • Edible Crafts
  • Felting
  • Glass Art
  • Indie Crafts
  • Kids Crafts
  • Jewelry Making
  • Lesson Plans
  • Needlework
  • Bath & Body
  • Party Ideas
  • Candle Making
  • DIY Weddings
  • Not Craft
  • Free Craft Projects

Copyright © 2026 · CraftGossip | Start Here | Contact Us | Link to Us | Your Editors | Privacy and affiliate policy