• Home
  • Suggest A Craft
  • DIY Newsletter

Craft Gossip

Independent craft blog since 2007

  • About CraftGossip
  • Our Network
    • Bath & Body Crafts
    • Candle Making Ideas
    • Crochet Ideas
    • Cross Stitch
    • Edible Crafts
    • Felting Patterns
    • Glass Art
    • Home & Garden Ideas
    • Indie Crafts
    • Jewelry Making
    • Kids Crafts
    • Knitting Patterns
    • Lesson Plans
    • Needlework
    • Party Ideas
    • Polymer Clay
    • Quilting Ideas
    • Recycled Crafts
    • Scrapbooking
    • Sewing Patterns
    • Card Making
    • DIY Weddings
    • Not Craft Ideas
  • Giveaways
  • Roundups
  • Store
  • Search

DIY Pom pom bunny rabbit

March 14, 2021 by Larissa Coleman

Easter is a wonderful time for family and friends to gather and create memories together. One great way to do this is through crafting, which allows you to express your creativity and make beautiful decorations for the holiday. The Easter bunny is a particularly popular and adorable symbol of Easter, and the craft highlighted in this article is just one example of the many ways you can create your own Easter bunnies at home.

This particular craft is easy to make and suitable for all ages. It’s a great way to spend time with family and friends, whether you’re a child or an adult. Not only is it fun to make, but it’s also a great way to decorate your home or to give as a gift to loved ones.

Easter crafts are not only enjoyable but also educational. They can help children to learn about different shapes, colors, and textures. They also help to develop fine motor skills, creativity and attention span.

Overall, crafting Easter bunnies is a great way to bring the family together and create memories that will last a lifetime. So, gather your materials, break out the glue and paint, and let the crafting begin! With this simple and adorable Easter bunny craft, you’ll have hours of fun and meaningful activities for the whole family.

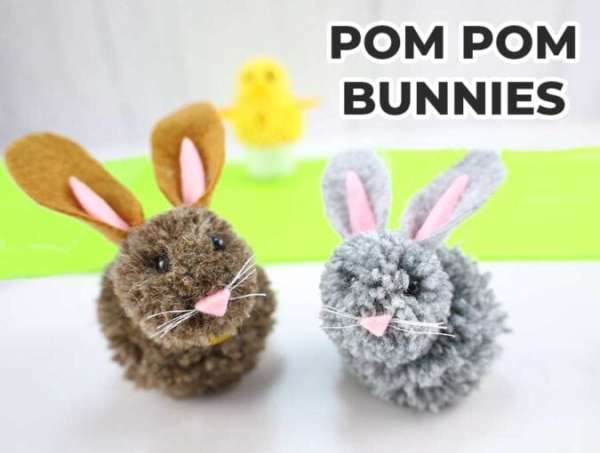
This adorable Easter bunny is super easy to make and is a ton of fun for all ages!

Not sure about you, but I always like to set the holiday mood by preparing handmade gifts or home decor in advance. It makes my heart sing when there is an event to look forward to, no matter whether it is a big or a small celebration.

Read These Next

  • 12+ Bunny Rabbit Cards for Spring
  • How to Make Perfect Pom Poms
«
»

Have you read?

DIY Milk Jug Halloween Skeleton Faces – Day of the Dead Inspired

Every year when Halloween rolls around, I find myself itching to create something new for the porch or entryway. Pumpkins are fun, but I also love projects that are thrifty and a little unexpected. These DIY milk jug skeleton faces tick all the boxes—they’re spooky, colorful, and upcycled from something you’d normally toss in the recycling bin.

Even better, they’re inspired by Mexican sugar skulls (Calaveras), which makes them perfect for those of us who like blending Halloween with a touch of Day of the Dead artistry. If you’ve ever admired the bold, painted skulls covered in flowers and bright designs, this is a playful and budget-friendly way to bring that style into your own decorations.

Why You’ll Love This Craft

  • Eco-Friendly: A brilliant way to recycle old milk jugs instead of tossing them. 
  • Budget-Friendly: Uses supplies you probably already have—markers, paint, string, scissors. 
  • Customizable: Every skull face can be completely different—no two need to match. 
  • Festive & Fun: Bright colors bring cheer to your Halloween and fall décor. 
  • Kid-Friendly: Safe for older kids and teens to paint and decorate (you may need to pre-cut the jugs). 

Supplies You’ll Need

  • Empty gallon milk jugs (washed and labels removed) 
  • Sharpie markers or acrylic paints (assorted bright colors plus black) 
  • Paintbrushes (thin ones for detail) 
  • Scissors or a craft knife (adult use recommended) 
  • Hole punch 
  • Yarn, twine, or string for hanging 
  • Beads (optional, for string decoration) 
  • Battery-operated tea lights (optional for glowing effect) 

Step-by-Step Tutorial

Step 1: Prepping the Jugs

Start by giving your empty milk jugs a good wash to get rid of any milk residue (trust me, you don’t want lingering smells). Peel off labels and let them dry completely. Using scissors or a craft knife, cut away one flat side of the jug so you’re left with a rounded “mask” shape. The spout becomes the chin of your skeleton face—it’s a surprisingly good fit!

Punch two small holes at the top corners of each cut-out so you can hang them later.

Step 2: Sketch the Skeleton Face

With a black Sharpie or paint, outline the classic skeleton features:

  • Eyes: Large hollow circles—cut them out completely for a mask look, or just color them black. 
  • Nose: A small upside-down heart or triangle shape. 
  • Mouth: A stitched line across the chin. Add short vertical lines to mimic teeth. 

This is your base—simple and spooky!

Step 3: Paint the Sugar Skull Details

Now comes the fun part. Sugar skulls are all about color, flowers, and swirls. Here are some ideas to get you started:

  • Paint colorful flower petals around the eyes. 
  • Add vines, spirals, or dot patterns across the forehead and cheeks. 
  • Use contrasting colors for bold designs—bright pinks, purples, turquoise, yellows, and greens work beautifully. 
  • Add little hearts or cross shapes for variety. 

If you’re working with kids, hand them markers instead of paints for easier cleanup.

Step 4: String & Bead the Decorations

Cut yarn or twine into long lengths for hanging. You can even thread beads onto the string for extra flair,. Tie the strings through the holes you punched and gather them together to hang on a door, wall, or tree branch.

They look especially festive grouped in threes or fives.

Step 5: Light Them Up (Optional)

For an extra wow factor, tuck a battery-operated tea light inside each jug before hanging. The plastic glows at night, and the painted details shine like stained glass. It’s a budget-friendly way to add some ambiance to your Halloween porch without the mess of real candles.

Tips & Variations

  • Use glow-in-the-dark paint for a spooky nighttime surprise. 
  • String a whole row together to make a garland across your porch or fence. 
  • Spray the inside of the jug with white paint for a more opaque look. 
  • Add glitter glue accents if you want them to shimmer in daylight. 
  • Try smaller jugs (like juice or creamer bottles) for mini skull faces. 

This project has become one of my favorite DIY Halloween decorations because it checks so many boxes: thrifty, creative, and surprisingly pretty for something made out of old milk jugs. Whether you’re decorating for trick-or-treaters, a fall party, or just want to add some seasonal cheer, these milk jug skeleton faces bring a Day of the Dead flair to your home.

They’re also a great activity for family craft nights—each person can design their own skull and you’ll end up with a gallery of colorful, quirky faces to hang around the house.

So next time you finish a jug of milk, don’t toss it—save it for Halloween crafting!

RSS More Articles

  • Trick or Treat in Style with the Free Happy Jack Treat Bag Pattern
  • DIY Eyeball Plant – Creepy Halloween Craft with Ping Pong Balls
  • DIY Milk Jug Halloween Skeleton Faces – Day of the Dead Inspired
  • 13 Witchy Halloween Card Ideas using Stamps and Dies
  • Create Personalized Dish Towels with DIY Infusible Ink: A Simple Craft Idea
  • DIY Clay Egg Tray – Handmade Farmhouse Charm for Your Kitchen
  • Textured Hat Knitting Patterns
  • Free Crochet Skull and Bones Granny Square Pattern
  • Easy Fall Crafts To Decorate Your Home
  • Copycat Sizzler Cheese Toast Recipe – Bring Back the Family Favorite

Pick Your Blog

  • Sewing
  • Knitting
  • Quilting
  • Crochet
  • Home & Garden
  • Recycled Crafts
  • Scrapbooking
  • Card Making
  • Polymer Clay
  • Cross-Stitch
  • Edible Crafts
  • Felting
  • Glass Art
  • Indie Crafts
  • Kids Crafts
  • Jewelry Making
  • Lesson Plans
  • Needlework
  • Bath & Body
  • Party Ideas
  • Candle Making
  • DIY Weddings
  • Not Craft
  • Free Craft Projects

Copyright © 2025 · CraftGossip | Start Here | Contact Us | Link to Us | Your Editors | Privacy and affiliate policy