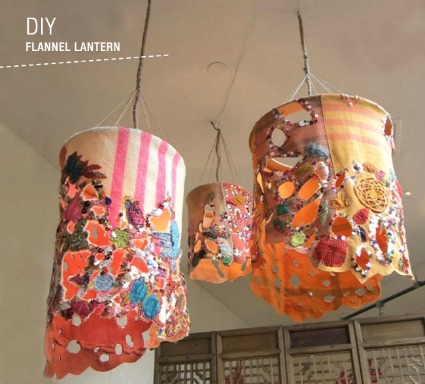
I adore the colorful, bohemian flair of these flannel lanterns spotted at Green Wedding Shoes! These vibrant beauties were created by Free People who generously shared a video tutorial so you can make your own, and add some drama to your wedding decor. Click here to get the tutorial.
Have you read?
The Pancake Market Bag – Free Crochet Pattern
Looking for a lightweight, stylish, and oh-so-practical tote to take with you everywhere this season? The Pancake Crochet Market Bag might just become your go-to favorite. Whether you’re heading to the farmers market to grab some fresh produce, packing snacks and sunscreen for a relaxed summer stroll, or dashing out the door for a quick last-minute errand, this bag is ready to tag along.
It’s surprisingly roomy—big enough to carry all your essentials (and then some!)—yet it folds up small enough to tuck into your car or coat closet without fuss. The openwork stitch gives it a breathable, airy texture that’s super satisfying to crochet and even more delightful to carry. Plus, it’s endlessly reusable and eco-friendly, so you can ditch the plastic and feel great about your handiwork.
I stitched mine up using a warm mustard cotton I had on hand (a little stash buster win!), but honestly, this pattern would look beautiful in just about any color. Try a bold berry for a pop of personality, a classic cream for a minimalist vibe, or even stripes if you’re feeling playful. Once you’ve made one… fair warning: you’ll probably want to make more!
Let’s dive into the pattern!
What You’ll Need:
- Worsted weight cotton yarn, about 250 yards
- Hook: 5.0 mm (or whatever suits your tension)
- Yarn needle
- Scissors
- Stitch markers (optional but helpful!)
Finished Measurements:
- Approximately 15” wide x 13” tall (not including handles)
Stitch Abbreviations (US terms):
- ch – chain
- sc – single crochet
- dc – double crochet
- sl st – slip stitch
- st(s) – stitch(es)
- sk – skip
- rep – repeat
Special Notes:
- The base is worked in joined rounds.
- The body of the bag is stitched in the round, but you won’t be joining after each round—just keep going in a spiral and use a stitch marker to track the first stitch.
- The handles are created by chaining across stitches, then the final edge is reinforced.
Let’s Crochet the Base:
Round 1: Begin with a magic circle, ch 1. Work 8 sc into the ring. Pull it tight and join to the first sc with a sl st. (8 sts)
Round 2: Ch 1, make 2 sc in each st around. Join. (16 sts)
Round 3: Ch 1, sc in first, 2 sc in next—repeat from * to * around. Join. (24 sts)
Round 4: Ch 1, sc in next 2 sts, 2 sc in next—repeat around. Join. (32 sts)
Round 5: Ch 1, sc in next 3, 2 sc in next—repeat. Join. (40 sts)
Keep increasing in this manner, adding one more sc between increases each round until you reach 80 sts (about Round 9).
Build the Bag Body:
Now switch to working in continuous rounds.
Rounds 10–13: sc in each st around. (80 sts)
Round 14: [dc in next, ch 1, sk 1]—repeat around. (approx. 80 sts depending on exact starting point)
Round 15: dc in ch-space, ch 1—repeat.
Rounds 16–25: Repeat Round 15.
Alternate a few more rounds of single crochet with rounds of [dc, ch 1] to build height and texture. Keep going until the bag measures about 12–13” tall from the center of the base.
Add the Handles:
Next Round (handle setup):
- sc in next 12 sts
- ch 30 (for handle), sk 15 sts
- sc in next 25 sts
- ch 30, sk 15 sts
- sc to end of round.
Final Round: sc around, placing 1 sc in each sc and 1 sc in each ch across the handle chains. This gives the straps some strength and a nice finish.
Fasten off and weave in all ends. Give your bag a little stretch or light steam block if needed.
Tips:
- Cotton yarn gives the bag structure and durability.
- You can easily size up the bag by adding more rounds to the base before beginning the body.
- Try using multicolor yarn for a fun summer vibe.

