• Home
  • Suggest A Craft
  • DIY Newsletter

Craft Gossip

The largest independent craft review site since 2007

  • About CraftGossip
  • Our Network
    • Bath & Body Crafts
    • Candle Making Ideas
    • Crochet Ideas
    • Cross Stitch
    • Edible Crafts
    • Felting Patterns
    • Glass Art
    • Home & Garden Ideas
    • Indie Crafts
    • Jewelry Making
    • Kids Crafts
    • Knitting Patterns
    • Lesson Plans
    • Needlework
    • Party Ideas
    • Polymer Clay
    • Quilting Ideas
    • Recycled Crafts
    • Scrapbooking
    • Sewing Patterns
    • Card Making
    • DIY Weddings
    • Not Craft Ideas
  • Giveaways
  • Roundups
  • Store
  • Search

DIY Concrete Candles You Can Make At Home

April 26, 2021 by Shellie Wilson

Making your own candles can be a fun and creative way to add some personalized decor to your home, or even create thoughtful gifts for friends and family. One unique and stylish way to do this is by making concrete candles. This DIY candle making tutorial is perfect for those who want to create a fancy industrial look with their candles.

One of the best things about this particular tutorial is that it doesn’t require any special molds. Instead, the creator shows you how to use common household items to create the molds needed for the candles. This means you can get started with this project right away without having to spend money on any extra supplies.

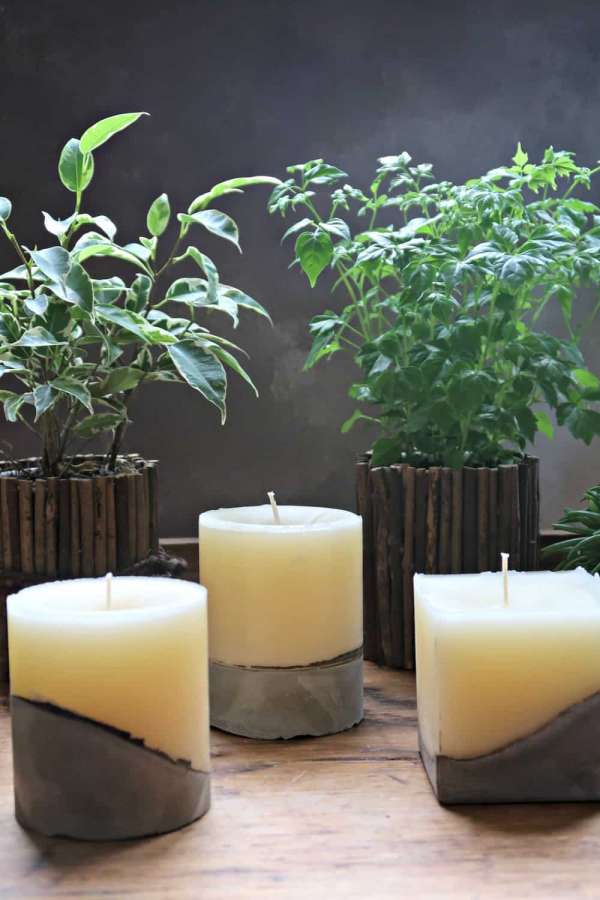
In addition to the unique concrete base, this tutorial also provides options for different shapes and sizes of candles. You can choose to make them straight or tilt the molds for a more organic, uneven look. This allows for even more customization and personalization in your candle-making process.

If you’re looking to create outdoor candles, adding citronella oil to your soy wax base can help ward off bugs and mosquitoes while you’re enjoying your patio or camping trip. This is a thoughtful and practical touch that can make your candles even more useful for those who love spending time outdoors.

Overall, this concrete candle-making tutorial is a great way to get started with candle-making or to add a unique touch to your existing candle collection. With its easy-to-follow instructions and customizable options, you’ll have fun experimenting with different shapes, sizes, and scents to create your own one-of-a-kind candles.

. This tutorial uses concrete as the base of the candle for a fancy industrial look.

You can tilt your mold or make them straight. The best thing about this Candle making tutorial is that it doesn’t require any special molds, she shows you how to use household items to create these DIY candles.


Read These Next

  • 18 Concrete Planters To DIY For Your Home And Garden
  • How To Make A Industrial Desk - 15 Projects
«
»

Have you read?

Easy Ways to Make Your Cross Stitch Better

The post over at The Crafty Mummy has the click-baity title of “Is there a right or wrong way to cross stitch?” Of course the answer is no. As with any other craft, as long as you are happy with the results you’re doing it right and no one should try to convince you otherwise.

That said, there are things that you can do to make your cross stitch a little better if you aren’t totally happy with the way your projects are looking. They might not be considered the “right way,” but they are important things to think about and if you want to deviate from these “rules” at least you’ll know that you’re doing it.

You can head over there to read all the tips, but it’s things like making sure your stitches are all going in the same direction (meaning you stitch the bottom legs of a row all in the same direction, then work back and stitch all the top legs in the same direction). You wouldn’t think something like that would make a huge difference until you don’t do it and then you can’t unsee it.

Most of things things aren’t rules so much as they are reminders to be consistent in what you are doing as you work a project. So however you start doing things like stitch direction or the number of strands of floss (I might even add using a hoop versus not, since the hoop can stretch the fabric and change the tension of the stitches a bit) you should continue in that way throughout the project in order for it to look its best.

Head over to The Crafty Mummy to read the rest of her list, then come back here if you have something to add. I’d love to hear your thoughts!

[Photo: The Crafty Mummy]

RSS More Articles

  • Easy Ways to Make Your Cross Stitch Better
  • 12 Handmade Masculine Card Ideas for Father’s Day
  • The Perfect Sewing Guide for Making Indian Clothes
  • Minecraft Learning Activities
  • Knit a Spiky Balaclava
  • 12 Scrapbook Layout Ideas using Repeated Shapes
  • Upcycling or Hoarding? Why Your DIY Projects Could Be Doing More Harm Than Good
  • Circle Of Leaves Afghan Pattern
  • Make a Stunning DIY Paper Vase – A Creative and Budget-Friendly Craft
  • How to Make a Rag Quilt – An Easy, Cozy Beginner-Friendly Tutorial

Pick Your Blog

  • Sewing
  • Knitting
  • Quilting
  • Crochet
  • Home & Garden
  • Recycled Crafts
  • Scrapbooking
  • Card Making
  • Polymer Clay
  • Cross-Stitch
  • Edible Crafts
  • Felting
  • Glass Art
  • Indie Crafts
  • Kids Crafts
  • Jewelry Making
  • Lesson Plans
  • Needlework
  • Bath & Body
  • Party Ideas
  • Candle Making
  • DIY Weddings
  • Not Craft
  • Free Craft Projects

Copyright © 2025 · CraftGossip | Start Here | Contact Us | Link to Us | Your Editors | Privacy and affiliate policy