Chalkboard wedding signs are one of those decorating ideas that never really go out of style. They are practical, affordable, easy to customize, and they instantly add that handmade touch brides and grooms often want for a DIY wedding. Whether you are planning a rustic barn wedding, a garden reception, a vintage-style celebration, or a relaxed backyard wedding, chalkboard signs can be used almost anywhere throughout the day.
You do not need to be a professional lettering artist to make them look beautiful either. With a few simple tricks, some chalk markers, a printed template, or a cutting machine such as a Cricut, you can create signs that look polished without paying for custom signage. The original post mentions using a Cricut machine and includes a linked tutorial with tips for working with chalk, so this is a great project for couples who want handmade wedding details but still want a neat finished result.
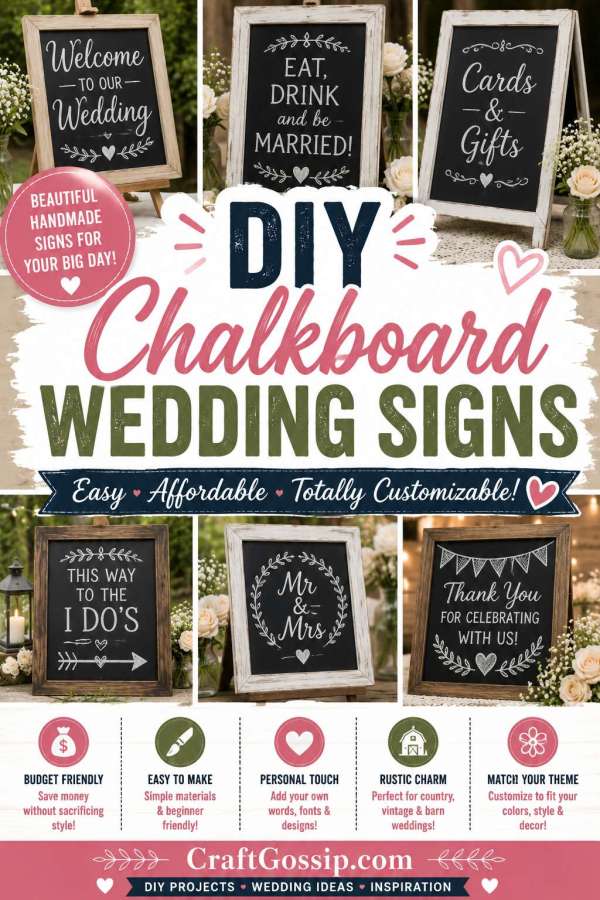
The lovely thing about DIY chalkboard wedding signs is how flexible they are. You can make a large welcome sign for the entrance, a sweet “Cards & Gifts” sign for the gift table, a menu board for the buffet, a drinks list for the bar, table numbers, ceremony directions, photo booth instructions, hashtag signs, or a simple “Thank You” sign near the exit. Once you start thinking about it, there are so many little places where a sign can make the day feel more organized and more personal.
Chalkboard signs are also very budget-friendly because you can reuse old frames, thrifted mirrors, picture frames, wooden boards, or small tabletop easels. A coat of chalkboard paint can turn almost any flat surface into a wedding sign. If you are decorating on a tight budget, look for frames at charity shops, garage sales, discount stores, or even around your own home. Mismatched frames can look beautiful together when they are all painted in the same colour or styled with matching flowers and greenery.
Why Chalkboard Signs Work So Well For Weddings
A good wedding sign does more than decorate. It helps guests know where to go, what to do, and what to expect. That means fewer awkward questions on the day and a smoother experience for everyone.
Chalkboard signs are especially useful because they can be changed right up until the last minute. If your menu changes, your seating arrangement shifts, or you decide to move the guest book table, you can simply wipe and rewrite the sign. That makes them a clever choice for DIY weddings, where plans often evolve during setup.
They also photograph beautifully. A chalkboard sign beside a bunch of flowers, a timber crate, a lace runner, a lantern, or a jar of wildflowers can create that warm handmade wedding look without needing a lot of expensive styling.
DIY Chalkboard Wedding Sign Ideas
You can use chalkboard signs for almost every area of your wedding. Here are a few easy ideas to include in your setup:
Welcome Sign
Place a large framed chalkboard at the ceremony entrance with the couple’s names and wedding date. Add a few simple hand-drawn leaves, hearts, or flowers around the edges.
Ceremony Direction Sign
Use a chalkboard arrow or standing board to point guests toward the ceremony, reception, bathrooms, parking, or photo area.
Cards And Gifts Sign
A small chalkboard beside your card box makes it clear where guests should place envelopes and gifts.
Menu Board
Write your meal options, dessert table treats, or cocktail menu on a large chalkboard near the food station.
Bar Sign
A chalkboard drinks list is perfect for signature cocktails, mocktails, beer and wine options, or a self-serve lemonade stand.
Table Numbers
Small chalkboards or mini framed signs can be used as simple table numbers.
Guest Book Sign
Encourage guests to leave a message with a sweet handwritten prompt.
Photo Booth Sign
Let guests know where to take photos, what props to use, or which hashtag to add if you are sharing photos online.
Thank You Sign
A chalkboard thank-you sign near the exit or favor table is a lovely final touch.
What You’ll Need
Chalkboard, framed board, mirror, timber board, or picture frame
Chalkboard paint if making your own surface
Chalk or chalk markers
Ruler or measuring tape
Pencil or transfer paper
Printed lettering template
Cricut or vinyl lettering if using a cutting machine
Soft cloth or cotton buds for cleaning edges
Optional flowers, greenery, ribbon, lace, or timber easel for styling
Amazon is handy for chalk markers, chalkboard paint, mini easels, and reusable chalkboard labels. If you already use a Cricut, vinyl lettering can give you a crisp finish, especially for larger signs that need to be read easily from a distance.
Brief Tutorial: How To Make A DIY Chalkboard Wedding Sign
Start by choosing the size and style of sign you need. A large welcome sign works well in a full-size frame or on a timber board, while smaller signs can be made using mini chalkboards, framed photos, or small easels.
If you are making your own chalkboard surface, paint the board or frame insert with chalkboard paint and allow it to dry fully. Two coats usually give a better finish. Once dry, lightly rub the surface with chalk and wipe it clean. This helps “season” the chalkboard so your writing looks softer and more natural.
Plan your wording before you start writing. Keep the message simple and easy to read. Wedding signs need to be clear at a glance, so avoid squeezing too much text onto one board.
If you are confident with hand lettering, sketch your design lightly first. If not, print your wording in your chosen font, rub chalk over the back of the paper, place it on the board, and trace over the letters. This leaves a faint chalk outline you can fill in with a chalk marker.
For a cleaner look, use a white chalk marker for the main words and add small decorative details such as leaves, hearts, flourishes, or tiny flowers. Do not overdo the decoration; simple borders and corner details often look the most elegant.
Let the marker dry completely before touching the surface. If you make a mistake, use a damp cotton bud or soft cloth to tidy the edges.
Style the finished sign with flowers, greenery, lace, ribbon, candles, lanterns, or a wooden easel to match the rest of your wedding décor.
Tips For Better Wedding Chalkboard Signs
Use large, bold lettering for the most important words. Guests should be able to read the sign quickly without standing right in front of it.
Stick to one or two fonts. A mix of script and block lettering looks lovely, but too many fonts can make a sign hard to read.
Use chalk markers instead of regular chalk if you want a stronger, cleaner finish.
Keep signs consistent by using the same frame colour, lettering style, or floral decoration across the wedding.
Make important directional signs larger than decorative signs. A welcome sign or ceremony direction board should be easy to spot.
Test your chalk marker on a small corner first. Some markers are not fully erasable on porous chalkboard surfaces.
You don’t have to be an artist to create these DIY chalkboard signs. This tutorial shows you how to make your own chalkboard wedding signs for your DIY Wedding with Cricut machine . The tutorial is easy to follow with some great tips on working with chalk. You can read the full tutorial here.
