• Home
  • Suggest A Craft
  • DIY Newsletter

Craft Gossip

The largest independent craft review site since 2007

  • About CraftGossip
  • Our Network
    • Bath & Body Crafts
    • Candle Making Ideas
    • Crochet Ideas
    • Cross Stitch
    • Edible Crafts
    • Felting Patterns
    • Glass Art
    • Home & Garden Ideas
    • Indie Crafts
    • Jewelry Making
    • Kids Crafts
    • Knitting Patterns
    • Lesson Plans
    • Needlework
    • Party Ideas
    • Polymer Clay
    • Quilting Ideas
    • Recycled Crafts
    • Scrapbooking
    • Sewing Patterns
    • Card Making
    • DIY Weddings
    • Not Craft Ideas
  • Giveaways
  • Roundups
  • Store
  • Search

CROCHET APPLIQUE

October 24, 2009 by jd wolfe

Applique is something I learned to love when I was a quilter. Since becoming a crocheter, I’ve seen plenty of pretties that I think would look great sewn or glued onto a jean jacket, tote bag, or scarf. Here are some ideas for you.

CRO APPLIQUE TOTE 093009

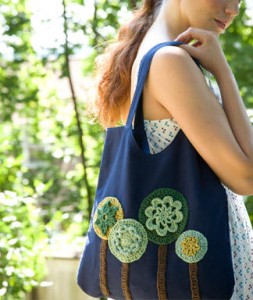
http://www.womansday.com/Articles/Crafts/Crocheting/Craft-Project-Crochet-Tree-Tote.html

For Halloween, you might enjoy this one:

cro pumpkin applique 1009

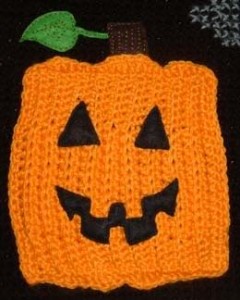
http://tallennl.livejournal.com/16060.html

or this:

cro skull applique 1009

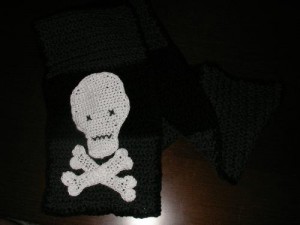
http://crochetme.com/patterns/skull-and-cross-bones-motif

Or, try one of these:

cro flower donna applique 1009

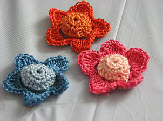
http://www.freepatternsdonnascrochetdesigns.com/patches-applique-pattern-index.html

Such a simple but effective addition to a store bought jacket, sweater or shirt for your little one:

cro applique seams  1009

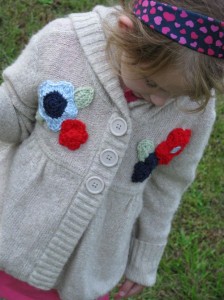
http://seamsoflife.typepad.com/seams_of_life/2009/10/the-other-sweater.html

Once you’ve chosen your foundation (what you’ll affix the applique to), how will you affix it?  There are several methods.  They are pretty much interchangeable, but you’ll find some a bit more challenging or expensive.  Hand sewing is by far the least expensive way to apply an applique, especially if the foundation is fabric.  If the foundation is itself crochet, don’t use sewing thread.  Use one or two plies of the yarn with which you created the applique.  Sewing thread will cut through the yarn in short order, destroying your handiwork.

Two other methods are easier, but aren’t suited to all applications.  First is iron on fusing.  This is a web sold under various names (like WonderUnder or ThermOWeb) that you must use an iron to apply.  Typically, you’ll adhere the web to your applique, then peel off the web backing and adhere the applique to your foundation.  This is fairly easy to do if you’ve got a denim piece as you can work from the wrong side of the fabric to apply the iron.  Takes 6 hands, but you can do it!

The easiest method IMO is glue.  There are several brands that will work well for this application.  I prefer Aleene’s Fabric Fusion.  Other good brands are Beacon’s Fabri-Tac or Border Patrol.  Read the container directions.  The downside is that you’ll need about 24 hours of drying time – more if your area is very humid.  Be sure to use a glue that is machine or hand washable.  Most are not dry cleanable.

Another idea is a glue called ‘Tack It Over and Over’.  This is another Aleene’s product.  You can use it to make your applique removeable. You can use it to apply the applique from one garment to another.  Between times, you ’stick’ your applique on some wax paper.  The glue is good for up to 6 changes, but I wouldn’t trust it that long.  I’ve reapplied the glue after only 2-3 moves.  Don’t want to lose my handwork.  For this, the applique must be very lightweight and preferrably not dimensional.

Read These Next

  • 50 Quilted Tote Bag Patterns
  • 15 Halloween Scarf Patterns You Can Crochet
«
»

Have you read?

Speed Piecing Stack-N-Whack Blocks: 3 Time-Saving Hacks for Impatient Quilters

The first time I tried a Stack-N-Whack quilt, I spent three hours carefully aligning my fabric layers, only to realize I’d rotated one stack 90 degrees by accident. My “kaleidoscope” looked more like a funhouse mirror.

After that disaster (and a few choice words), I became obsessed with finding faster, foolproof ways to piece these mesmerizing blocks—without the headache.

Here are the three game-changing hacks that cut my Stack-N-Whack time in half (and saved my sanity):

Hack #1: The “No-Fuss” Cutting Trick

(Because measuring each layer is for overachievers)

What You’ll Need:

  • Rotary cutter with a fresh blade (dull blades = frayed tempers)
  • Non-slip ruler grips (or painter’s tape on the back)
  • Glow-in-the-dark masking tape (trust me)

How It Works:

  • Stack fabrics RIGHT SIDES UP (no flipping needed).
  • Mark your first cut line with the tape on your ruler—no measuring repeats!
  • Cut all layers at once with firm pressure.

Why It’s Magic:

  • Eliminates measuring errors (goodbye, mismatched points!)
  • The tape line glows under dim sewing room lights (night owl approved)

Pro Tip: Use sandpaper grips under your fabric stacks—they prevent shifting better than prayers.

Hack #2: Chain-Piecing Like a Boss

(Because threading the needle 87 times is torture)

The Problem:

Traditional piecing has you:

  • Sew one unit
  • Clip threads
  • Repeat ad nauseam

The Fix:

  • Arrange ALL your identical units in order (e.g., all “A” triangles).
  • Feed them through continuously without lifting the presser foot.
  • Snip apart later while binge-watching your favorite show.

Bonus Speed Boost:

  • Use leader/ender scraps to avoid thread nests at the start.
  • Try 50wt thread—thinner = less bulk when clipping.

Real-World Results:

  • 48 half-square triangles pieced in under 15 minutes (vs. 45+ the old way).

Hack #3: The “Pressing Station” Shortcut

(Because ironing is the quilter’s treadmill—necessary but boring)

Set Up Your Battle Station:

  • Iron RIGHT next to your machine (no steps = no procrastination)
  • Mini design board (foam core + flannel) to organize units
  • Best Press starch (prevents stretching during assembly)

The Lazy Quilter’s Pressing Flow:

  • Sew a seam ? immediately press (no piling up!)
  • Use the “hover and steam” method for seams:
  • No dragging = no distortion
  • Faster than full-on pressing
  • Twirl seams open with a chopstick (no fingernail damage)

Confession: I once timed myself—this shaved 2 hours off a queen-size quilt.


RSS More Articles

  • Make Your Own Stylish Half Circle Skirt in Just a Few Steps: A Simple Sewing Tutorial
  • Speed Piecing Stack-N-Whack Blocks: 3 Time-Saving Hacks for Impatient Quilters
  • Designer Spotlight: Natalka Studio
  • Paw Print Shaped Dog Mini Album
  • Another Great Shawl to Use Your Leftovers
  • Mother’s Day Gift Guide 2025: My Top Amazon Picks She’ll Actually Love
  • The Quilter’s Fabric Dictionary: 57 Terms You Need to Know
  • How to Fix a Missed Crochet Stitch (No Frogging Needed!)
  • Best Sewing Machine for Quilting Beginners: Your No-Stress Buying Guide
  • McCall’s Half-Price Pattern Sale – Starts Friday!

Pick Your Blog

  • Sewing
  • Knitting
  • Quilting
  • Crochet
  • Home & Garden
  • Recycled Crafts
  • Scrapbooking
  • Card Making
  • Polymer Clay
  • Cross-Stitch
  • Edible Crafts
  • Felting
  • Glass Art
  • Indie Crafts
  • Kids Crafts
  • Jewelry Making
  • Lesson Plans
  • Needlework
  • Bath & Body
  • Party Ideas
  • Candle Making
  • DIY Weddings
  • Not Craft
  • Free Craft Projects

Copyright © 2025 · CraftGossip | Start Here | Contact Us | Link to Us | Your Editors | Privacy and affiliate policy