• Home
  • Suggest A Craft
  • DIY Newsletter

Craft Gossip

The largest independent craft review site since 2007

  • About CraftGossip
  • Our Network
    • Bath & Body Crafts
    • Candle Making Ideas
    • Crochet Ideas
    • Cross Stitch
    • Edible Crafts
    • Felting Patterns
    • Glass Art
    • Home & Garden Ideas
    • Indie Crafts
    • Jewelry Making
    • Kids Crafts
    • Knitting Patterns
    • Lesson Plans
    • Needlework
    • Party Ideas
    • Polymer Clay
    • Quilting Ideas
    • Recycled Crafts
    • Scrapbooking
    • Sewing Patterns
    • Card Making
    • DIY Weddings
    • Not Craft Ideas
  • Giveaways
  • Roundups
  • Store
  • Search

Creating Aromatherapy Candles

May 22, 2007 by SandraW

LavenderAdding a few drops of essential oil to your melted wax before pouring is a simple way to make an aromatherapy candle. Alternately, if you want to add an aromatherapy scent to an unscented candle you can put several drops of essential oil around the wick before lighting. Essential oils are not the same as manufactured perfume scents because the oil is distilled from the actual plants leaves and stems as opposed to being chemical or man made.

Some suggested scents to alleviate different ailments and moods:

Lavender and Bergamot are good for anxiety. I find Lavender especially soothing and it is a pleasant smell most men enjoy. According to Fox News, every smell boosts men’s sexual arousal, but Lavender and the smell of pumpkin pie knocks it up 40% more. Lavender and Jasmine are recommended scents for depression.

Chamomile tea has been known to sooth shattered nerves and this essential oil’s smell is also comforting for irritability.
Ylang Ylang is one of my favorites and is supposed to be both relaxing and stimulating because it is touted to be both an aphrodisiac and an antidepressant. Bergamot is also used to lift spirits.

Peppermint and Citronella help invigorate you which makes sense because they are both refreshing.

For some essential oil recipe combinations see Ananda Apothecary’s site. They are for air fresheners, but if you reduce the amounts to a couple drops each they would also work for candles. I especially like their recipe called “essential sunshine”, a combination of lime, orange, grapefruit and patchouli. Candles by Montserrat offers many different essential oils for sale along with candle making lessons.

There’s an ancient soothing appeal to candles, but when you add an aromatherapy scent to them it can add to the ambiance by influencing your mood further.

If anyone has an essential oil recipe combo for pumpkin pie spice, let me know!
Read These Next

  • 10 DIY Bath And Body Recipes For When You Have A Headache
  • 12 DIY Candles You Can Make At Home Using Ice
«
»

Have you read?

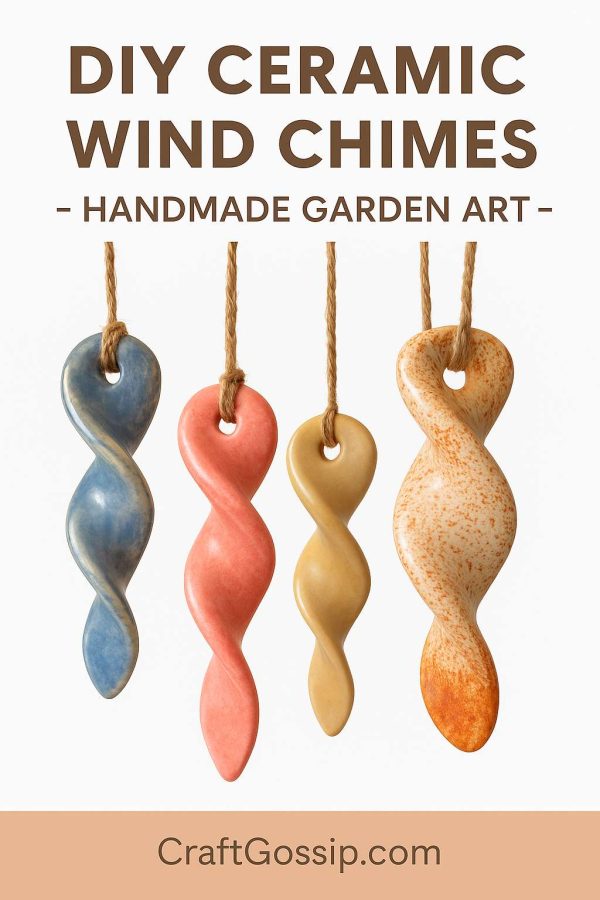
How to Make Handmade Pottery Ceramic Wind Chimes

There’s something so magical about the gentle clink-clink of ceramic wind chimes swaying in the breeze. Unlike the sharp tones of metal chimes, pottery pieces create a softer, more earthy sound that feels grounding and peaceful. If you’ve been looking for a creative clay project that’s both decorative and functional, making your own ceramic wind chimes is a beautiful way to combine art with nature.

Why Choose Ceramic Wind Chimes?

Pottery wind chimes are a wonderful project because they’re:

  • Customizable – You can play with shapes, glazes, and textures. 
  • Eco-friendly – Made with natural clay, they blend beautifully with garden spaces. 
  • Functional décor – They add sound, movement, and a handmade touch to patios, porches, or even indoor corners. 
  • Great for gifting – A handmade chime is a heartfelt, personal present. 

Materials You’ll Need

  • Pottery clay (stoneware or earthenware) 
  • Clay tools (knife, rib, rolling pin, sponge, etc.) 
  • Twine, jute cord, or fishing line 
  • Wooden or ceramic ring/base for hanging 
  • Pottery glazes or underglazes 
  • Access to a kiln (or a community pottery studio for firing) 

Optional: Texture tools such as lace, stamps, or leaves for pressing designs into the clay.

Step-by-Step Tutorial

Step 1: Prepare Your Clay

Start by wedging your clay to remove air bubbles. Roll it out into a slab about ¼ inch thick. Consistency in thickness ensures the chimes make a balanced sound and don’t crack while firing.

Step 2: Shape the Chimes

Cut or hand-form your chime pieces. You can create long twists (like in the photo), bell-shaped forms, discs, or even leaf imprints. The variety of shapes will create different tones when they strike against each other.

Tip: Add a hole at the top of each piece using a skewer or straw so you can thread the cord later. Make sure the holes are wide enough for your stringing material.

Step 3: Add Texture & Details

Press in designs using lace, wooden stamps, or even everyday items like forks or buttons. These impressions not only add character but also make the glaze more interesting once fired.

Step 4: Dry & Bisque Fire

Allow your pieces to dry slowly to prevent cracks. Once fully dry (bone dry), bisque fire them in a kiln according to your clay type’s instructions.

Step 5: Glaze & Fire Again

Apply glaze in your favorite colors. You can go rustic with earthy tones or bright and glossy for a modern look. Once glazed, fire the pieces again to maturity.

Step 6: Assemble the Wind Chime

Thread your twine or fishing line through each piece, tying secure knots. Attach them to a central wooden or ceramic ring, leaving enough space for each chime to move freely in the wind. Adjust the lengths so the pieces gently collide with each other to create sound.

Step 7: Hang & Enjoy

Find a breezy spot outdoors—like a porch, patio, or garden arch—and hang your creation. The sound will be subtle, soothing, and uniquely yours.

Design Ideas to Try

  • Twisted forms like spirals or ribbons (as pictured) create movement and look stunning in the light. 
  • Themed chimes – try seashell shapes, stars, moons, or even botanical-inspired designs. 
  • Minimalist discs with speckled glaze for a modern, clean look. 
  • Upcycled base – hang your chimes from a driftwood branch or an old embroidery hoop. 

Making ceramic wind chimes is not only a fun pottery project but also a way to bring a little handmade music into your home. Every time the breeze catches them, you’ll be reminded of the joy of creating something with your own two hands.


RSS More Articles

  • How to Make Handmade Pottery Ceramic Wind Chimes
  • My Honest Take on Sewing the Nina Jumpsuit from Creativebug
  • 12 Road Trip Travel Scrapbook Layout Ideas
  • Use LEGOs to Build Landmarks from Around the World
  • Get Your Fruits by Knitting the Fruit Salad Vest
  • Why Do Your Kids Play with the Box? An Interview with Child Psychologist Dr. Lucy Harper
  • Ottomania- Free Crochet Pattern
  • How to Make Your Own Lush-Inspired Massage Bar at Home
  • Snowflakes Falling on My Head Quilt Pattern
  • Spooky and Stylish: How to Make Halloween Splatter Pumpkins for a Bold Décor Statement

Pick Your Blog

  • Sewing
  • Knitting
  • Quilting
  • Crochet
  • Home & Garden
  • Recycled Crafts
  • Scrapbooking
  • Card Making
  • Polymer Clay
  • Cross-Stitch
  • Edible Crafts
  • Felting
  • Glass Art
  • Indie Crafts
  • Kids Crafts
  • Jewelry Making
  • Lesson Plans
  • Needlework
  • Bath & Body
  • Party Ideas
  • Candle Making
  • DIY Weddings
  • Not Craft
  • Free Craft Projects

Copyright © 2025 · CraftGossip | Start Here | Contact Us | Link to Us | Your Editors | Privacy and affiliate policy