• Home
  • Suggest A DIY
  • DIY Newsletter

Craft Gossip

Independent craft blog since 2007

  • About CraftGossip
  • Our Network
    • Bath & Body Crafts
    • Candle Making Ideas
    • Crochet Ideas
    • Cross Stitch
    • Edible Crafts
    • Felting Patterns
    • Glass Art
    • Home & Garden Ideas
    • Indie Crafts
    • Jewelry Making
    • Kids Crafts
    • Knitting Patterns
    • Lesson Plans
    • Needlework
    • Party Ideas
    • Polymer Clay
    • Quilting Ideas
    • Recycled Crafts
    • Scrapbooking
    • Sewing Patterns
    • Card Making
    • DIY Weddings
    • Not Craft Ideas
  • Giveaways
  • Roundups
  • Store
  • Search

Conversations with Craft Wars Judge & Michaels’ Crafting Expert Jo Pearson!

August 14, 2012 by Heidi Gustad

20120814-194552.jpg It’s no secret that I spent the last few days in Dallas representing Craft Gossip at a blogger event. Check out my daily roundups from yesterday and the day before for a taste of what I got up to, the crafts all of us bloggers got to make, and some of the new products Michaels will be carrying this year.

Not unimportantly, however, was getting to meet and craft with Jo Pearson, known most recently for being a judge on TLC’s Craft Wars, and longtime creative force behind Michaels Stores’ craft inspiration sheets, online videos, craft cruises and more. She has a total dream job!

After breakfast on Monday, Jo answered some questions we all submitted before the event. I passed on the questions you guys submitted in the comments on this post, but wasn’t able to get answers to all of them since there were 15 of us asking just one person tons of stuff.

All about Craft Wars

A lot of the bloggers wanted to know about Craft Wars (even though one of us, Beckie of Infarrantly Creative, will be competing on an upcoming episode!). The scoop on Craft Wars is that it’s completely produced and owned by TLC. When they hadd the idea for the show, they approached Jo individually to be a judge. Since she also works for Michaels, she talkedd to the Michaels team about the opportunity. Long story short, Jo ended up being hired to judge Craft Wars, and Michaels seccured a spot as the supply sponsor for the whole thing.

Jo talked about the craziness of the Craft Wars TV set, and she had a couplle things to share right away. TLC does not decide who wins each episode, it’s completely up to the three judges. Jo also said that if it were up to her, she’d have picked out different supplies for the contestants to work with.

Members of Michaels’ PR firm were there for our group chat with Jo and helped answer a few questions too. Most notably, they said that Michaels doesn’t currently know if TLC is planning a second season of the show.

The Michaels Crafting Team

Jo heads up Michaels’ team of about 6 crafters who design the projects you see in stores, ads, classes, etc. Every day in Jo’s life is a little different, and she loves what she does. She said that she and her team  are all passionate about what they do. “We craft from the inside out,” Jo says. “We’re makers.”

I meant it when I said she has a total dream job!
«
»

Have you read?

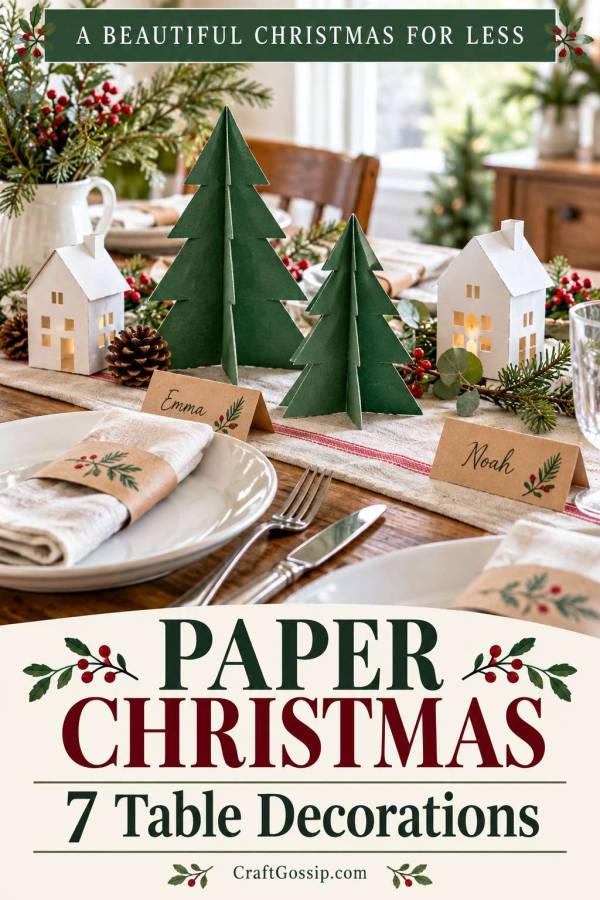
Christmas on a Budget – 7 Christmas Table Decorations You Can Make from Paper to Save Money

Before buying Christmas table decorations, open the paper drawer.

Leftover gift wrap, scrapbook offcuts and plain cardstock can become name cards, little trees and festive table details.

You do not need a cutting machine or a coordinated craft kit. A pair of scissors, a ruler and a little patience will cover most of these projects.

Paper is particularly useful when you want a colour-pop Christmas table on a small budget. Repeat one or two colours across a few simple decorations and the setting starts to feel coordinated.

Pick two or three projects rather than trying to make all seven.

Gather your supplies first

Look for:

  • Cardstock or clean, suitable packaging card.
  • Wrapping-paper scraps.
  • Plain paper.
  • Scissors and a ruler.
  • A pencil and a writing pen.
  • Existing paper glue or double-sided tape.

Card works best for standing decorations. Thin wrapping paper is better for covering a card base.

Make a sample before cutting enough pieces for every guest.

1. Folded name cards

Cut cardstock into rectangles measuring approximately 10 × 8 cm.

Mark the halfway point along the 8 cm sides, then fold to create a standing card with a face approximately 10 × 4 cm.

Write the name before adding embellishments.

A small drawn star or a narrow paper strip is plenty. Check that the name is readable from the guest’s seat.

Saving tip: use the plain side of suitable card and cover unwanted printing only where necessary.

2. Paper napkin bands

Cut paper strips approximately 4 cm wide.

Wrap one around a folded napkin to find the required length, including a small overlap. Secure the ends with tape or glue.

Make the bands loose enough to slide off without tearing.

Use one paper across all settings or repeat a shared colour through different patterns.

Saving tip: gift-wrap offcuts are useful here because the napkin supports the paper.

3. Slot-together paper trees

Draw a symmetrical tree shape with a flat bottom and cut two identical pieces from sturdy cardstock.

On the first tree, cut a slit from the top to the midpoint. On the second, cut from the bottom to the midpoint.

Slide the shapes together at right angles. Adjust the slit width gradually to suit the card thickness.

Test that the tree stands before cutting the rest.

Saving tip: two or three trees can be enough for a small display.

4. A miniature Christmas village

Our paper Christmas town tutorial provides a more detailed project with houses and trees.

Use one colour for a simple village or limit yourself to two coordinating shades.

Allow the glue to dry thoroughly before moving the buildings.

Saving tip: display the village on a sideboard if your dining table needs every centimetre for lunch.

5. Paper angel napkin holders

These paper angel napkin holders make a traditional Christmas detail.

Test the template size with one napkin before preparing a full set. Decorate the card with suitable fabric or paper scraps.

Saving tip: use the same base colour while allowing small differences in the paper covering.

6. Flat paper stars

Draw or trace a simple star onto card.

Cut it out, cover it with paper if needed and add a guest’s name. Place it beside the plate or attach it to a napkin band.

Keep decorative paper away from uncovered food and damp dishes.

Saving tip: a few larger stars are easier to tidy and store than dozens of tiny pieces of confetti.

7. A paper-star wreath

Our paper-star wreath tutorial uses covered card shapes arranged on a ring.

Hang it near the table using a suitable fixing. This gives the dining area a focal point without taking serving space.

Saving tip: use the same paper on the wreath and name cards to connect the room.

Keep all paper decorations away from flames, heat and wet surfaces. Pack dry pieces flat where possible and label the box for next year.

The paper scraps you nearly discarded might be all the Christmas colour your table needs.

RSS feed: More Articles More Articles

  • 12 Christmas Cross Stitch Patterns for Cat Lovers
  • Easy Christmas Fabric Gift Basket Sewing Pattern (Perfect for Beginners)
  • 10 Easy Margarita Recipes for Taco Nights, BBQs and Summer Gatherings
  • IKEA KALLAX Room Divider DIY: Create a Cosy Corner With Storage and Style
  • 5 Christmas Sweater Knitting Patterns Worth Casting On
  • Wet Felting with a Hand-Held Sander – My Honest Experience (and Safety Tips You’ll Actually Use)
  • How to Make Cross Stitch Christmas Gift Tags With Small Fabric Scraps
  • Thanksgiving Turkey Scrapbook Layouts to Gobble Up
  • 10 DIY Angel Jewelry Tutorials For Christmas
  • Crochet Christmas Dove Ornaments With a Printable Gift Poem

Pick Your Blog

  • Sewing
  • Knitting
  • Quilting
  • Crochet
  • Home & Garden
  • Recycled Crafts
  • Scrapbooking
  • Card Making
  • Polymer Clay
  • Cross-Stitch
  • Edible Crafts
  • Felting
  • Glass Art
  • Indie Crafts
  • Kids Crafts
  • Jewelry Making
  • Lesson Plans
  • Needlework
  • Bath & Body
  • Party Ideas
  • Candle Making
  • DIY Weddings
  • Not Craft
  • Free Craft Projects

Copyright © 2026 · CraftGossip | Start Here | Contact Us | Link to Us | Your Editors | Privacy and affiliate policy