• Home
  • Suggest A Craft
  • DIY Newsletter

Craft Gossip

Independent craft blog since 2007

  • About CraftGossip
  • Our Network
    • Bath & Body Crafts
    • Candle Making Ideas
    • Crochet Ideas
    • Cross Stitch
    • Edible Crafts
    • Felting Patterns
    • Glass Art
    • Home & Garden Ideas
    • Indie Crafts
    • Jewelry Making
    • Kids Crafts
    • Knitting Patterns
    • Lesson Plans
    • Needlework
    • Party Ideas
    • Polymer Clay
    • Quilting Ideas
    • Recycled Crafts
    • Scrapbooking
    • Sewing Patterns
    • Card Making
    • DIY Weddings
    • Not Craft Ideas
  • Giveaways
  • Roundups
  • Store
  • Search

Chicken wire egg cups

September 1, 2009 by Stefanie Girard

egg-cup 
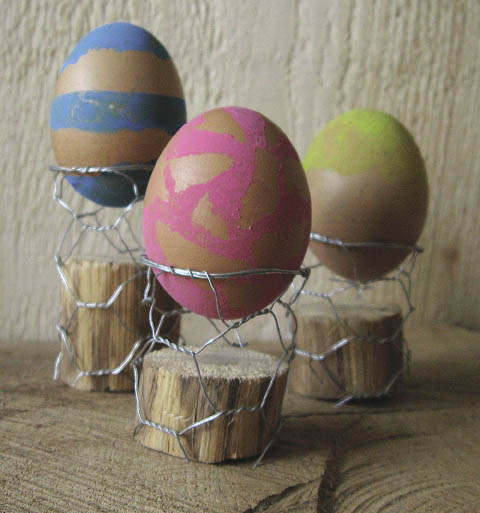
I love, love, love this idea because I love, love, love eggs and chicken wire! Esprit Cabane posted this super cute egg cup project. I am going out to the yard to look for a branch that I can use for this project which brings me to a tip- when doing yard work keep you eye out for interesting shaped branches that you can use in your crafting or floral displays. I scored a really curly one yesterday that is going to be great for a spooky Halloween decoration. Oh and if you like chicken wire projects check out this cuff bracelet made with mini chicken wire.

Technorati Tags: recycled craft, chicken wire egg cups

Read These Next

  • 20 Must Try Recipes Using Cadbury Creme Easter Eggs
  • 12 Dark and Spooky Halloween Cards with Stamps and Dies
«
»

Have you read?

Pottery Clay – DIY Divided Tapas Serving Platter with Illustrated Sections

Every good hostess knows a serving platter is the secret weapon at a party. It corrals snacks, makes everything look intentional, and saves you from running back and forth with little bowls. This DIY divided platter takes that idea one step further: each section is labeled with hand-drawn illustrations, making it both useful and irresistibly charming.

The original inspiration came from these  tapas-style platters, but we’re creating an English version featuring everyday snacks and nibbles. It’s fun, it’s functional, and it makes even store-bought crackers look Pinterest-worthy.

Materials You’ll Need

  • White ceramic clay (or air-dry clay if you don’t have access to a kiln) 
  • Rolling pin or slab roller 
  • Oval platter base template (downloadable below) 
  • Divider templates (downloadable below) 
  • Scoring tool + slip for joining clay 
  • Sponge and rib tool for smoothing 
  • Cobalt blue underglaze pencil OR blue underglaze with a fine brush 
  • Kiln + clear glaze (for ceramic clay) OR a food-safe sealant (for air-dry clay) 

Step-by-Step Tutorial

Step 1: Shape the Base

Roll a slab of clay about ½ inch thick. Place the oval platter template on top and cut out your base. Smooth edges with a damp sponge.

Step 2: Add Dividers

Use the divider templates to cut strips of clay. Attach them to the base by scoring and slipping. Smooth joins and curve the edges slightly for a handmade look.

Step 3: Refine

Let the platter dry until it’s leather-hard. At this stage, you can tidy the walls, soften corners, and make sure the surface is smooth.

Step 4: Draw Your Illustrations

Here’s where the personality shines. Using an underglaze pencil or fine brush, sketch quick doodles into each section. Keep them loose and playful, not perfect. Our platter has:

  • Cheese – wedges with holey details 
  • Ham – loose stack of wavy slices 
  • Anchovies – three slim fish outlines 
  • Sardines – larger, striped fish drawings 
  • Salami – one log plus a few round slices with dotted speckles 
  • Olives – oval shapes with pits, some sliced open 
  • Tomatoes – little cluster of round tomatoes tied together 

Note: Drawings are slightly altered from the original for a fresh, unique design.

Step 5: Fire and Finish

  • For ceramic clay: bisque fire, add clear glaze, and glaze fire. 
  • For air-dry clay: allow to dry fully, then paint with a clear food-safe sealant if you’ll use it for food. Otherwise, it makes a perfect decorative tray. 


RSS More Articles

  • Pottery Clay – DIY Divided Tapas Serving Platter with Illustrated Sections
  • Rosh Hashanah Cross Stitch Patterns
  • Overseas Yarn Companies Pause Shipments to US
  • How to Make a Giant Fabric Wall Bow for Party Decor – A Fun and Simple DIY Project!
  • 12 Handmade Cozy Card Ideas for Autumn
  • Get Spooky and Stitchy with the Happy Halloween Quilt Booklet
  • Long Bridal Sweater by Regina Weiss (Morale Fiber)
  • Transform Dollar Tree Finds into Spooky Halloween Decor – A Budget-Friendly DIY Hack!
  • Monday Musings: When Your Hobby Becomes Your Job (And How Not to Burn Out)
  • Baby Footprint Blanket Knitting Patterns

Pick Your Blog

  • Sewing
  • Knitting
  • Quilting
  • Crochet
  • Home & Garden
  • Recycled Crafts
  • Scrapbooking
  • Card Making
  • Polymer Clay
  • Cross-Stitch
  • Edible Crafts
  • Felting
  • Glass Art
  • Indie Crafts
  • Kids Crafts
  • Jewelry Making
  • Lesson Plans
  • Needlework
  • Bath & Body
  • Party Ideas
  • Candle Making
  • DIY Weddings
  • Not Craft
  • Free Craft Projects

Copyright © 2025 · CraftGossip | Start Here | Contact Us | Link to Us | Your Editors | Privacy and affiliate policy