• Home
  • Suggest A DIY
  • DIY Newsletter

Craft Gossip

Independent craft blog since 2007

  • About CraftGossip
  • Our Network
    • Bath & Body Crafts
    • Candle Making Ideas
    • Crochet Ideas
    • Cross Stitch
    • Edible Crafts
    • Felting Patterns
    • Glass Art
    • Home & Garden Ideas
    • Indie Crafts
    • Jewelry Making
    • Kids Crafts
    • Knitting Patterns
    • Lesson Plans
    • Needlework
    • Party Ideas
    • Polymer Clay
    • Quilting Ideas
    • Recycled Crafts
    • Scrapbooking
    • Sewing Patterns
    • Card Making
    • DIY Weddings
    • Not Craft Ideas
  • Giveaways
  • Roundups
  • Store
  • Search

CARLA’S ‘QUILTS’ – THE SPECS – PART THREE

June 26, 2009 by jd wolfe

carla-tied-back-quilt-0609

Here’s what the back of one of Carla’s completed, hand-tied afghan quilts looks like.  This is exactly the same technique used by ‘conventional’ quilters to make hand-tied quilts.  The quilt is always a ’sandwich’ consisting of the pieced (in this case crocheted squares joined together) design, the middle layer of batting (fleece, fiberfill, an old blanket, toweling, or just another piece of fabric), and the backing which is either quilted in a decorative style or tied like this one.  A crocheted ‘quilt’ is has much more stretch than a quilt made from woven fabric, thus the wrinkles in the back of carla’s quilt will disappear when the quilt is in use.  There must be excess fabric on the back to allow the flexibility of the crocheted front.

For the most part, Carla uses a 2.5 mm hook with DK weight yarn to make squares that measure from 5X5 cm to 10 X 10 cm.  Using these sizes of squares, Carla is a talented artist who creates these lovely, unique afghans. Each blanket is almost 7 feet square and weighs about 5 kilograms – a whopping 11 pounds!  That should keep anyone warm – from his toes to the crown of his head.  I have a son at home who’d love to receive an afghan this large AND with this much weight AND with no holes.  A dream come true for my 25 year old son.  Maybe I should ship him to Amstelveen near Amsterdam, Netherlands where Carla resides…..

Some of Carla’s intricate designs are made using an embroidery graph as a guide.  This is the case for the wonderful orangutan afghan picture in Part One of this series.  Carla likes the work of Elizabeth Bradley in the UK for these graphs. http://www.elizabethbradley.com/


Finished back of Carla’s completed afghan ‘quilt’.

carla-loose-ends-0609Here’s a picture of the back of one of Carla’s completed afghans, before she has added the backing.  Anyone like loose ends??? Here’s Carla’s DEEP DARK SECRET:  one of the reasons Carla applies the backing to her quilts is so she won’t have to weave in all these loose ends.  Smart lady!

This prolific artist also has a nature blog – and her photos there provide a lot of the inspiration for her crochet.  She’s as good at photography as she is at crochet.  Check it out!

http://www.carladebruijn.nl/#

Although the text is in Dutch, we can ALL enjoy photographs no matter what language the photographer speaks.

To view more of Carla’s work, please visit her website:

http://www.carladebruijn.nl/

I’m so happy she offered to share her artistry with the rest of us!  Thanks, Carla.


«
»

Have you read?

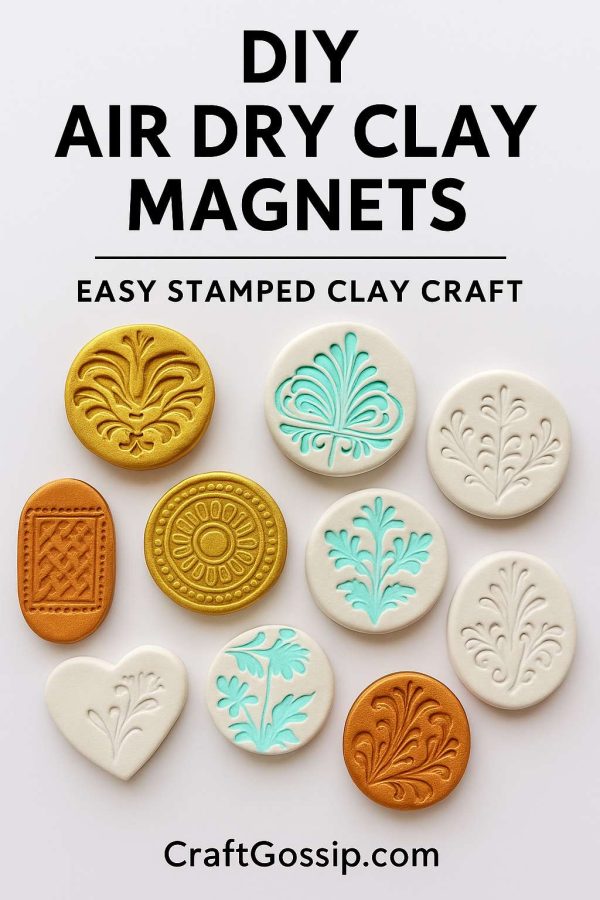
DIY Air Dry Clay Magnets – Easy Stamped Clay Craft

There’s something wonderfully nostalgic about clay crafts, isn’t there? The cool, smooth texture in your hands, the way it slowly transforms with just a little pressure and imagination—it’s both soothing and creative. Today, we’re making DIY air dry clay magnets that are stamped, painted, and perfect for adding a handmade touch to your fridge or craft room.

This project is simple, relaxing, and looks far more “designer” than it really is. Think of it as pottery without the kiln—no fancy equipment needed!

Why You’ll Love This Project

  • Uses air dry clay – no oven or kiln.

  • Great for leftover clay scraps.

  • Endless possibilities with different stamps, textures, and paints.

  • Makes thoughtful handmade gifts (great for teachers, neighbors, or stocking stuffers).

  • Works as a fun craft session with teens or grandkids.

Supplies You’ll Need

  • Air dry clay (white works best for stamping)

  • Rubber stamps or textured items (lace, doilies, leaves, even buttons!)

  • Acrylic paint or ink pads

  • Rolling pin (or just grab a glass bottle)

  • Circle cookie cutter (or jar lid)

  • Magnets (strong flat-backed ones work best)

  • Strong craft glue or hot glue gun

  • Sealer (optional: Mod Podge or matte varnish)

Step-by-Step Tutorial

Step 1 – Roll Out Your Clay

Start with a small ball of clay and roll it out to about ¼ inch thick. Not too thin, or it’ll crack while drying, and not too chunky, or your magnets will be too heavy.

Step 2 – Stamp and Texture

Press your chosen rubber stamp or textured object firmly into the clay. Don’t worry about perfection—slight variations give that handmade charm.

Tip: If you’re using an ink pad, you can ink the stamp before pressing to add instant color to the impression.

Step 3 – Cut Out Shapes

Use a cookie cutter, jar lid, or knife to cut neat circles (or any shape you like—hearts, squares, even freeform ovals).

Step 4 – Smooth Edges

Gently smooth the edges with damp fingers or a bit of water. This gives a polished finish.

Step 5 – Dry

Place your pieces on baking paper and allow them to dry for 24–48 hours. Flip halfway through to prevent curling.

Step 6 – Paint or Highlight

Once dry, you can leave them natural or lightly brush paint over the raised designs to highlight the texture. Metallics (gold, silver, copper) look stunning, but even soft pastels give a pretty effect.

Step 7 – Seal (Optional)

If you want extra durability, brush on a thin coat of Mod Podge or varnish.

Step 8 – Attach Magnets

Finally, glue a magnet to the back of each piece. Let the glue cure fully before sticking them on your fridge.

Variations to Try

  • Rustic farmhouse look: Use lace or burlap for stamping and paint with a whitewash effect.

  • Modern boho: Try geometric stamps and metallic paint accents.

  • Seasonal magnets: Use themed stamps (snowflakes, flowers, leaves) for year-round sets.

  • Kids’ art version: Let the kids press buttons, Lego bricks, or small toys into the clay for fun patterns.

Tips

These don’t just work as magnets—you can glue them onto gift tags, turn them into brooches, or even make them into pendants for necklaces. Once you start, you’ll be stamping everything in sight (don’t say I didn’t warn you!).

Handmade doesn’t have to be complicated or expensive. These DIY air dry clay magnets prove just that—simple materials, a little creativity, and you’ve got a set of unique, functional mini artworks. Perfect for gifting, decorating, or just adding a bit of joy to the everyday.


RSS feed: More Articles More Articles

  • DIY Air Dry Clay Magnets – Easy Stamped Clay Craft
  • HALO-5 Embroidery Machine Review: Are Five Needles Worth the Upgrade?
  • 14 FREE Vintage Botanical and Patterned Papers
  • How to Turn Any Quilt Pattern Into a Scrap Quilt (Without It Looking Messy)
  • How to Cross Stitch on Paper
  • Charity Crochet Pattern: Vintage Baby Bunting Cocoon
  • Emotional Support Ollivander Octopus Free Crochet Pattern
  • How to Make a Fun Fold Halloween Card
  • Freebie Friday – Vintage Halloween Candy Wrappers (Printable Ephemera)
  • Free Felting Tutorial Friday: Firm Felting with Armature

Pick Your Blog

  • Sewing
  • Knitting
  • Quilting
  • Crochet
  • Home & Garden
  • Recycled Crafts
  • Scrapbooking
  • Card Making
  • Polymer Clay
  • Cross-Stitch
  • Edible Crafts
  • Felting
  • Glass Art
  • Indie Crafts
  • Kids Crafts
  • Jewelry Making
  • Lesson Plans
  • Needlework
  • Bath & Body
  • Party Ideas
  • Candle Making
  • DIY Weddings
  • Not Craft
  • Free Craft Projects

Copyright © 2026 · CraftGossip | Start Here | Contact Us | Link to Us | Your Editors | Privacy and affiliate policy