• Home
  • Suggest A DIY
  • DIY Newsletter

Craft Gossip

Independent craft blog since 2007

  • About CraftGossip
  • Our Network
    • Bath & Body Crafts
    • Candle Making Ideas
    • Crochet Ideas
    • Cross Stitch
    • Edible Crafts
    • Felting Patterns
    • Glass Art
    • Home & Garden Ideas
    • Indie Crafts
    • Jewelry Making
    • Kids Crafts
    • Knitting Patterns
    • Lesson Plans
    • Needlework
    • Party Ideas
    • Polymer Clay
    • Quilting Ideas
    • Recycled Crafts
    • Scrapbooking
    • Sewing Patterns
    • Card Making
    • DIY Weddings
    • Not Craft Ideas
  • Giveaways
  • Roundups
  • Store
  • Search

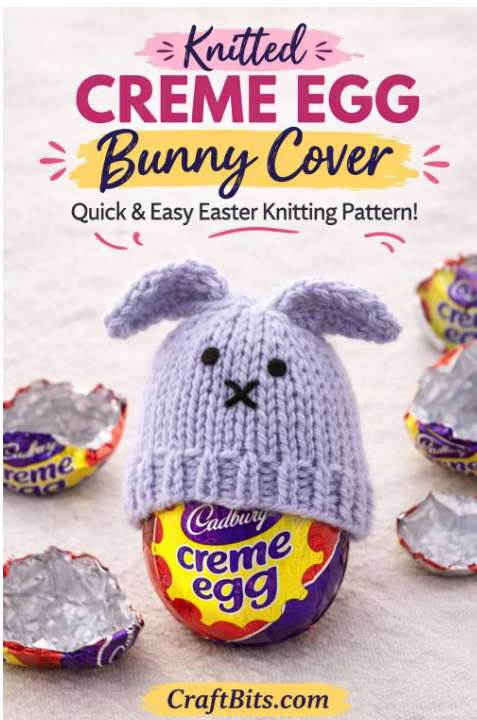
Cadbury Creme Egg Cover Bunny – A Quick Easter Knitting Pattern That’s Almost Too Cute

March 25, 2026 by Shellie Wilson

If you love those tiny seasonal knitting projects that use up odd bits of yarn and make people smile, this Cadbury Creme Egg Cover Bunny pattern from CraftBits is a sweet little Easter make worth a look. It’s designed as a knitted cover to fit a 40g Cadbury Creme Egg, worked flat in one piece, then sewn up at the side, with separate ears, a fluffy tail, and an embroidered face added at the end.

What I like about this pattern is that it has that old-school “quick knit with purpose” feel. It is the sort of thing you could pop onto an Easter table, tuck into a gift basket, or use as a fun little chocolate cover for kids, grandkids, teachers, or neighbours. The finished size is only about 2¼ inches wide by 2¼ inches high, so it is definitely one of those satisfying small projects that doesn’t demand a huge time commitment.

The materials list is very approachable too. It uses DK yarn, 3.25 mm knitting needles, a white fluffy or eyelash yarn for the tail, plus a yarn needle and a little dark yarn for the face embroidery. That means it is ideal for stash knitting, especially if you have a basket of leftover yarn that keeps breeding when you’re not looking.

The construction looks simple enough for confident beginners who are comfortable with basic shaping. The main cover starts with 25 stitches, works a few rows in rib, then moves into stocking stitch before decreasing to shape the top. The ears are knitted separately, and the tail is gathered into a little puff before being sewn on.

What makes this one especially appealing is the versatility. You could keep the bunny plain and classic, or easily give it more personality with stitched whiskers, sleepy eyes, pastel yarns, or even a tiny bow. It has that “make one and then suddenly you’re making six” kind of energy.

This is a lovely little pattern for knitters who enjoy novelty Easter projects, miniature gift knits, or chocolate-themed covers that feel a bit more special than just handing over an egg on its own. It’s quick, cute, and practical in that charming seasonal way. CraftBits even describes it as perfect for gift toppers, Easter baskets, or making your seasonal chocolate feel a bit more special, which really sums up the appeal.

You can view the full pattern here: Cadbury Creme Egg Cover Bunny – Free Knitting Pattern on CraftBits. 
«
»

Have you read?

How to Make String Quilt Blocks (Turn Fabric Scraps Into a Beautiful String Quilt)

If you’ve got a basket of long skinny fabric scraps and no idea what to do with them, string quilt blocks are your answer.

String quilting is one of the easiest and most forgiving scrap quilt techniques. It uses narrow strips of fabric sewn onto a foundation to create bold, colorful blocks that look far more complicated than they actually are.

In this step-by-step guide, you’ll learn exactly how to make string quilt blocks, what size scraps work best, how to keep them balanced, and how to turn them into a finished quilt.

What Is a String Quilt Block?

A string quilt block is made by sewing fabric strips (or “strings”) onto a foundation piece of fabric or paper.

The strips are usually:

  • 1″–2½” wide
    • Different lengths
    • Mixed prints and colors

The result is a layered, textured block with diagonal or straight-line movement.

String quilts are ideal for:

  • Scrap bins
    • Leftover binding strips
    • Jelly roll leftovers
    • Long skinny offcuts

They are one of the most waste-efficient quilt styles.

Why String Quilts Are Perfect for Scrap Fabric

String quilts are forgiving because:

  • Strip width doesn’t have to be identical
    • Seams don’t need to align
    • Color placement can be random
    • Slight inconsistencies add charm

This makes string quilting perfect for beginners who want to build confidence without worrying about perfect matching seams.

What Size Scraps Work Best for String Quilt Blocks?

Here’s what works beautifully:

Best strip width:
1½” to 2½”

Minimum length:
At least 6″–8″

If your strips are shorter, sew them together first to create longer “strings.”

If you only have very tiny scraps, crumb quilting may be a better option.

Supplies You’ll Need

  • Assorted fabric strips
    • Foundation fabric (muslin or lightweight cotton)
    • Rotary cutter & ruler
    • Sewing machine
    • ¼” seam allowance

Optional:
• Add a center accent strip for visual structure

Step-by-Step: How to Make String Quilt Blocks

Step 1: Cut Your Foundation

Cut foundation squares slightly larger than your finished block size.

Example:
For a 10″ finished block, cut foundation pieces 11″.

You’ll trim them down later.

Step 2: Place Your First Strip

Lay your first strip right side up, diagonally across the foundation.

This will anchor the block.

Some quilters like to use a consistent center strip for cohesion.

Step 3: Add the Second Strip

Place a second strip right sides together on top of the first strip.

Sew with a ¼” seam.

Flip open and press.

Step 4: Continue Adding Strips

Keep adding strips to one side until you reach the edge of the foundation.

Then flip the block and fill the opposite side.

Press regularly to prevent bulk.

Step 5: Trim the Block

Once the foundation is fully covered:

Flip block foundation side up.
Trim to your exact unfinished size.

If your finished block is 10″, trim to 10½”.

This squaring step is important.

Popular String Quilt Layout Ideas

String quilt blocks are surprisingly versatile.

Try:

  • All diagonal strips same direction
    • Alternate block rotation
    • Chevron layout
    • Controlled color gradient
    • Neutral center strip
    • Red center “spine” for classic look

Rotating blocks creates secondary patterns automatically.

How Many String Quilt Blocks Do You Need?

For 10″ finished blocks:

Baby Quilt (40″ x 50″) – 20 blocks
Lap Quilt (50″ x 60″) – 30 blocks
Throw Quilt (60″ x 70″) – 42 blocks
Twin Quilt (70″ x 90″) – 63 blocks

Adjust based on sashing and borders.


How to Keep String Quilts From Looking Chaotic

Scrap quilts need balance.

Use one or more of these tricks:

  • Repeat one neutral strip in every block
    • Keep background color consistent
    • Limit to 2–3 dominant color families
    • Alternate light and dark blocks
    • Add sashing

Structure keeps string quilts from feeling messy.

Beginner Mistakes to Avoid

  • Using strips that are too narrow (creates bulk)
    • Not pressing seams
    • Skipping trimming step
    • Mixing drastically different fabric weights
    • Forgetting seam allowance when trimming

Foundation fabric prevents stretching — don’t skip it.

Paper vs Fabric Foundation for String Quilts

Fabric foundation:
• Stays in quilt
• Adds stability
• Faster

Paper foundation:
• Removed after sewing
• Lighter finished quilt
• Slightly more work

Most beginners prefer fabric foundation.

Why String Quilts Are So Addictive

They’re repetitive in a relaxing way.

You can:

  • Sew without overthinking
    • Use scraps guilt-free
    • Chain piece easily
    • See fast progress

And somehow, those random strips always look intentional once trimmed into a square.

Making String Quilt Blocks

If your scrap basket is overflowing with strips, a string quilt block is one of the smartest ways to use them.

It’s forgiving.
It’s flexible.
And it turns leftover fabric into something bold and cohesive.

You don’t need perfectly matched prints.
You just need a consistent block size and a little trimming discipline.

The rest is just stitching.


RSS feed: More Articles More Articles

  • Fine Motor Task Cards for Kids
  • How to Make a Light Up Halloween Card
  • Designer Spotlight: Cross Stitch with Art
  • Free Foliage Embroidery Pattern Review
  • Easy Knit Baskets to Use All Your Stash
  • How to Make a Simple Fall Accordion Mini Album
  • Pumpkin Spice Hand Balm for Dry, Overwashed Hands
  • Learning about Ghana for Kids
  • Thrifted Quilt Ghost Decorations for Halloween
  • Garage Door Halloween Decorations

Pick Your Blog

  • Sewing
  • Knitting
  • Quilting
  • Crochet
  • Home & Garden
  • Recycled Crafts
  • Scrapbooking
  • Card Making
  • Polymer Clay
  • Cross-Stitch
  • Edible Crafts
  • Felting
  • Glass Art
  • Indie Crafts
  • Kids Crafts
  • Jewelry Making
  • Lesson Plans
  • Needlework
  • Bath & Body
  • Party Ideas
  • Candle Making
  • DIY Weddings
  • Not Craft
  • Free Craft Projects

Copyright © 2026 · CraftGossip | Start Here | Contact Us | Link to Us | Your Editors | Privacy and affiliate policy