• Home
  • Suggest A DIY
  • DIY Newsletter

Craft Gossip

Independent craft blog since 2007

  • About CraftGossip
  • Our Network
    • Bath & Body Crafts
    • Candle Making Ideas
    • Crochet Ideas
    • Cross Stitch
    • Edible Crafts
    • Felting Patterns
    • Glass Art
    • Home & Garden Ideas
    • Indie Crafts
    • Jewelry Making
    • Kids Crafts
    • Knitting Patterns
    • Lesson Plans
    • Needlework
    • Party Ideas
    • Polymer Clay
    • Quilting Ideas
    • Recycled Crafts
    • Scrapbooking
    • Sewing Patterns
    • Card Making
    • DIY Weddings
    • Not Craft Ideas
  • Giveaways
  • Roundups
  • Store
  • Search

Busy Bag – Easter Eggs The Kids Can Decorate Over And Over Again

March 8, 2018 by Shellie Wilson


This Easter Kids craft is the perfect addition to an Easter Themed busy bag.

The dry erase Easter egg can be decorated over and over again. It’s a great little gift to give small children too. Add some dry erase pens and a little carry bag to finish off this Non-candy DIY kids craft.

Materials:

  • Transparency paper
  • Cardstock
  • Glue
  • Scissors
  • Dry erase markers
  • Easter Egg Template

Instructions:

  1. Print and cut out the egg shape template.
  2. Trace the egg template onto a piece of cardstock.
  3. Cut out the egg shape that you have traced onto the cardstock. Cut it slightly inside of the lines, so that it is smaller than the printed out template.
  4. Holding the egg shape template on top of a piece of transparency paper, cut around the outside of the template. This will give you a piece of transparency paper that has an egg shape, and is slightly larger than your template.
  5. Place a layer of glue on the cardstock shaped like an egg. Lay the printed out template on top, and smooth out all of the bubbles.
  6. Once the glue has dried completely, place the egg shape you cut out of the transparency paper over top of the cardstock-backed egg shape.
  7. Decorate your egg by using dry erase markers to color on the transparency paper. Wipe off with a paper towel and repeat.
«
»

Have you read?

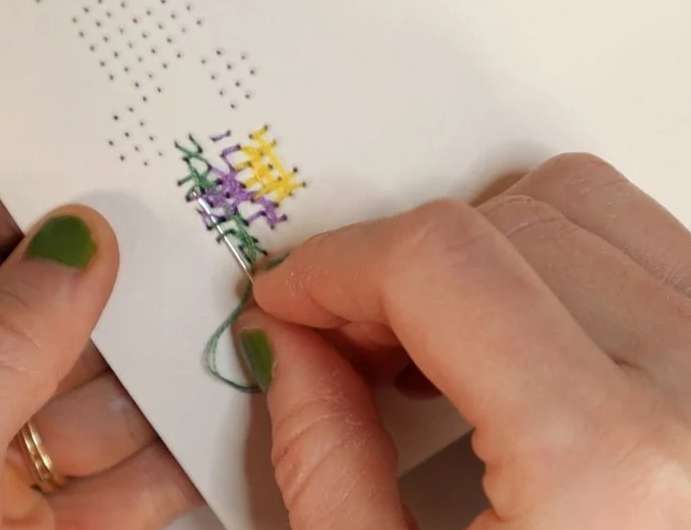
How to Cross Stitch on Paper

I’ve done embroidery on paper before and it’s a lot of fun. You can use a needle to punch out a particular shape to stitch, or my favorite thing is to take a copy of an old photograph or a page from a magazine and add stitched details to the original picture. 

One thing I haven’t tried but would also be fun to do is cross stitching on paper. 

This is a technique that requires a fair amount of preparation because you need to find a pattern you can easily transfer and print it at actual size, then use the pattern itself to help you decide where to put the holes in your paper. And then after all that you can do your stitching. 

It’s a pretty straightforward process, but Crewel Ghoul has a great tutorial that walks you through how to do it step by step. It even includes a sample pattern you can print out and try for practice. 

The post also has tips for starting and finishing your threads so that the back looks as neat as it can, if that’s something that’s important to you. (When I have done embroidery on paper I usually just tape the thread end to the back. If the back were going to show I’d probably just cover it with more paper.)

Stitching on paper is a fun way to make bookmarks or greeting cards, but you also need to make sure your paper is thick enough to support the holes you’ll be making in it. This post has a good rundown of materials you’ll need and what kind of paper is best. She used watercolor paper but I’ve used card stock and scrapbook paper that was a little thicker than the average printer paper. 

You can always test a little on the paper you’re considering to make sure it will stand up to the project. 

Check out the post, which includes a video, over at Crewel Ghoul for more tips for cross stitching on paper. Is this something you’ve tried before? I’d love to hear about it!

[Photo: Crewel Ghoul]

RSS feed: More Articles More Articles

  • How to Cross Stitch on Paper
  • Emotional Support Ollivander Octopus Free Crochet Pattern
  • Charity Crochet Pattern: Vintage Baby Bunting Cocoon
  • How to Make a Fun Fold Halloween Card
  • Freebie Friday – Vintage Halloween Candy Wrappers (Printable Ephemera)
  • Free Felting Tutorial Friday: Firm Felting with Armature
  • Five Senses Crafts and Activities for Preschool
  • Knit a Sweet Blanket with a Pocket for Treasures
  • Cute Halloween Scrapbook Mini Album
  • Breast Cancer Care Package In A Jar – A Thoughtful Pink Ribbon Gift You Can Make In Minutes

Pick Your Blog

  • Sewing
  • Knitting
  • Quilting
  • Crochet
  • Home & Garden
  • Recycled Crafts
  • Scrapbooking
  • Card Making
  • Polymer Clay
  • Cross-Stitch
  • Edible Crafts
  • Felting
  • Glass Art
  • Indie Crafts
  • Kids Crafts
  • Jewelry Making
  • Lesson Plans
  • Needlework
  • Bath & Body
  • Party Ideas
  • Candle Making
  • DIY Weddings
  • Not Craft
  • Free Craft Projects

Copyright © 2026 · CraftGossip | Start Here | Contact Us | Link to Us | Your Editors | Privacy and affiliate policy