• Home
  • Suggest A DIY
  • DIY Newsletter

Craft Gossip

Independent craft blog since 2007

  • About CraftGossip
  • Our Network
    • Bath & Body Crafts
    • Candle Making Ideas
    • Crochet Ideas
    • Cross Stitch
    • Edible Crafts
    • Felting Patterns
    • Glass Art
    • Home & Garden Ideas
    • Indie Crafts
    • Jewelry Making
    • Kids Crafts
    • Knitting Patterns
    • Lesson Plans
    • Needlework
    • Party Ideas
    • Polymer Clay
    • Quilting Ideas
    • Recycled Crafts
    • Scrapbooking
    • Sewing Patterns
    • Card Making
    • DIY Weddings
    • Not Craft Ideas
  • Giveaways
  • Roundups
  • Store
  • Search

Bullseye Quick Tip – Frit Balls

August 9, 2011 by Cathi Milligan

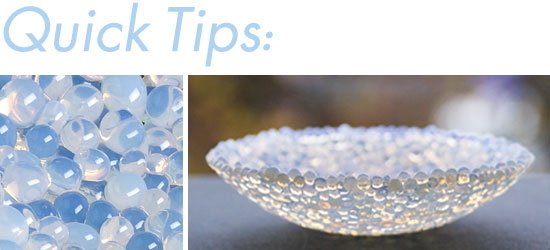
The picture Bullseye is using for this quick tip makes me crazy because I absolutely love opaline glass, which is the glass used. So lovely! So I’m just going to paste in the copy from the email and say, “for more information go over to Bullseye’s web site…” Now I’m going to run over to my kiln and make me some opaline frit balls!

Frit balls—easy to make and fun to use!

Spread out pieces of coarse frit (0003) on a primed kiln shelf, leaving space around each piece. Fire hot enough to round out the frits, usually 1500°F (816°C) with a 20-minute hold. There’s no need to anneal. Open the kiln and voila, you’ll find frit balls! Once they’re cool, rinse with glass cleaner and rub dry to remove primer dust. For opalescent styles that pick up primer, do a quick soak in CLR (calcium lime rust remover) before rinsing and drying. When clean, the frit balls are ready to use as design elements or for building larger forms.

The frit balls shown here were made with Opaline Striker frit, which should be fired on the cool side to achieve a pleasing translucent quality: 1480°F (804°C) with a 16-minute hold. Get Opaline Striker frit working notes.

To make the Opaline frit-ball bowl shown above, first create a dam by cutting a 5.5″ hole in a sheet of 1/8″ fiber paper, leaving the border intact. Place the dam on a primed kiln shelf and load it up with about 5 ounces of frit balls. Tack the balls together by firing at a rate of 300°F (167°C) per hour to 1375°F (746°C) for 10 minutes. Slump the piece in a separate firing using mold 8746 . We recommend annealing in both firings.

Learn more
If you’d like to learn more about kilnforming glass, check out these teaching studios in your region:

«
»

Have you read?

Pencil Knitting Patterns

Getting ready for back to school makes me think about pencil crafts, so let’s take a look at some pencil themed knitting patterns! 

I recently made a pencil on a circular knitting machine, and it was a fun, quick, easy project that uses little bits of leftover yarn (and if you don’t have yellow you can make it a colored pencil using whatever color’s your favorite). And if you want to make a bigger version check out this pattern from Orange Olive Road on Etsy.

If you want to knit a pencil pillow by hand, check out Sketchy, available on Ravelry from Shana S. Cohen. This one uses worsted weight yarn and has two size options and the choice to make a pencil with an eraser or a colored pencil. 

Pencil scarves seem to be the most popular kind of pencil knitting pattern, and there are lot of cute ones. This one from Cosy Craft UK mostly uses garter stitch, with some welts to add texture and what looks like an I-cord edging. It calls for DK weight yarn. 

If you want to go all garter stitch try this version from Emsley Co Creations, which uses five colors of DK weight yarn and just a little shaping to make the point of the pencil.

There’s also this fun, mostly stockinette so it looks like it curls a bit, pencil pattern that looks like it’s worked in chunky yarn from Little Knits Studio. This one uses just a little garter stitch and easy shaping for the point. 

If you don’t want a pencil scarf, how about some pencil socks? The No. 2 Pencil Socks from The Yarn Enabler are available from Ravelry and use five colors of sock yarn. They feature wide ribs to mimic the texture of a pencil and have options to be worked from the top down or the toe up. 

Needs Sharpening by Alexander Walker is a free pattern on Ravelry that uses five colors of sock yarn to make a sort of shortie sock. The little bit of black at the tips of the toes inspired the name. These, too, can be worked in either direction and are available in three sizes. 

RSS More Articles

  • Backpack Cross Stitch Patterns
  • Pencil Knitting Patterns
  • 15 Cardboard Crafts For Adults: Clever Ways To Use Boxes, Tubes And Packaging
  • Red Melt The Ice Slouch Beanie Crochet Pattern Review
  • These Bakery-Style Biscoff Cupcakes Disappear in Minutes
  • 15 Lush Dupe Recipes You Can Make At Home
  • Sewing for Seniors: A Roundup of Practical Patterns for Aged Care and Dementia
  • Honey Baby Bear Applique Machine Embroidery Design – Etsy Review
  • 80’s Inspired Boombox Shaped Mini Album
  • Free Baby Star Crochet Pattern: A Cosy Hooded Cocoon for Newborns

Pick Your Blog

  • Sewing
  • Knitting
  • Quilting
  • Crochet
  • Home & Garden
  • Recycled Crafts
  • Scrapbooking
  • Card Making
  • Polymer Clay
  • Cross-Stitch
  • Edible Crafts
  • Felting
  • Glass Art
  • Indie Crafts
  • Kids Crafts
  • Jewelry Making
  • Lesson Plans
  • Needlework
  • Bath & Body
  • Party Ideas
  • Candle Making
  • DIY Weddings
  • Not Craft
  • Free Craft Projects

Copyright © 2026 · CraftGossip | Start Here | Contact Us | Link to Us | Your Editors | Privacy and affiliate policy