There is no denying that throwing Pottery takes years to master but you know what the say right? Practice makes perfect. Not everyone has regular access to a Pottery Studio for lessons and this book helps you master it at home.
Independent craft blog since 2007

There is no denying that throwing Pottery takes years to master but you know what the say right? Practice makes perfect. Not everyone has regular access to a Pottery Studio for lessons and this book helps you master it at home.
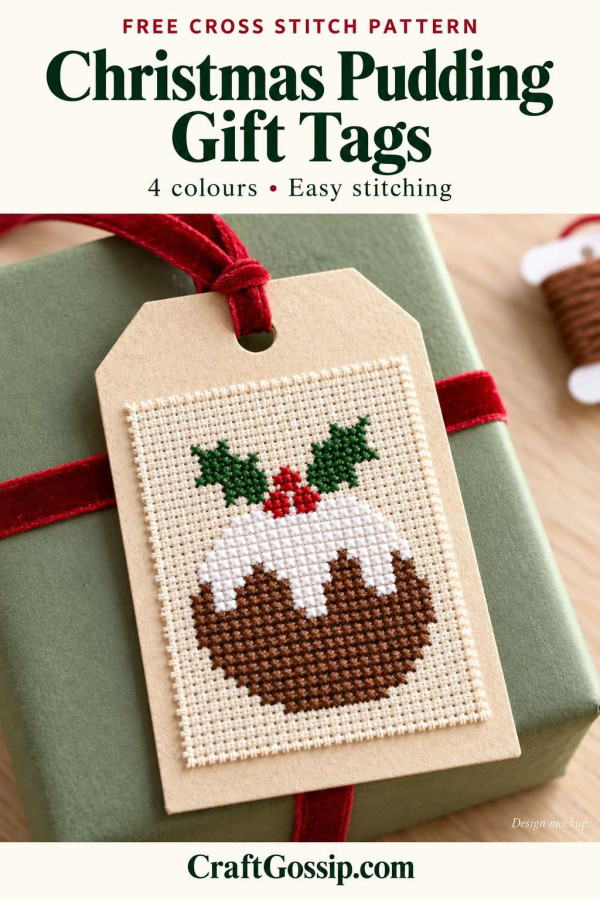
A little Christmas pudding stitched onto a gift tag feels like a present before anyone has even opened the parcel. There’s the rounded brown pudding, a generous helping of white icing and a tiny holly topping. All the festive charm, without having to remember when you last fed the fruitcake.
This free Christmas pudding cross stitch pattern uses just four thread colours and full cross stitches. It’s a small project for using leftover embroidery cotton and those pieces of Aida that are too useful to throw away, but somehow never quite big enough for anything else.
Mount the finished stitching on a kraft-card tag, tie it to a homemade hamper or add it to a special Christmas present. The recipient can keep it as a decoration after the wrapping paper has gone.
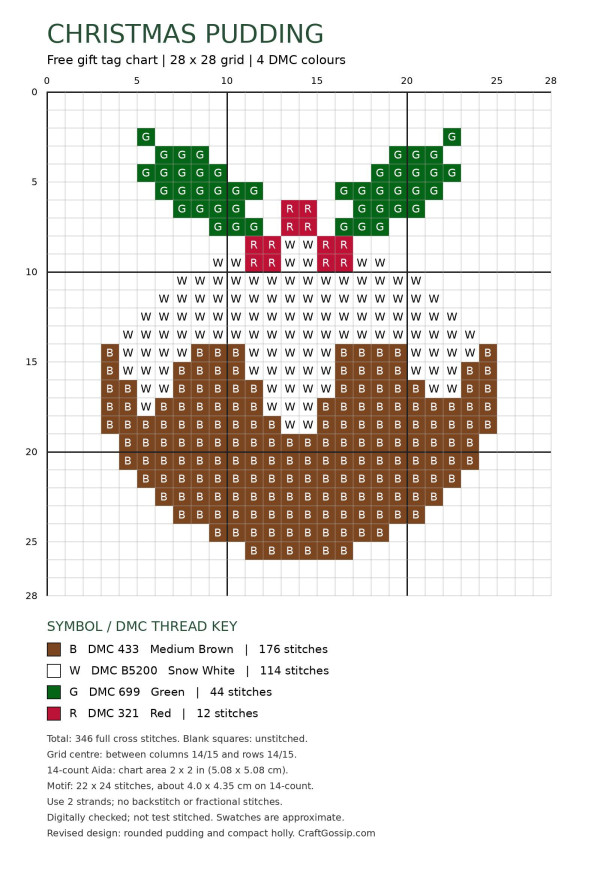
The high-resolution PNG includes the counted grid, colour symbols, DMC numbers and stitch counts. Save the original file so you can zoom in or print it clearly.
Pattern note: This original chart has been checked digitally for stitch counts and symbol consistency, but has not been test stitched. Any styled project images are mockups. Follow the counted chart for the stitch placement.
| Detail | Specification |
|---|---|
| Complete chart grid | 28 × 28 squares |
| Actual stitched motif | 22 stitches wide × 21 stitches high |
| Total stitches | 308 |
| Colours | Four |
| Stitch type | Full cross stitch |
| Backstitch or fractional stitches | None |
| Suggested fabric | 14-count Aida |
| Suggested thread | Two strands of six-strand embroidery cotton |
| Skill level | Beginner friendly |
On 14-count Aida, the pudding motif measures approximately 4 × 3.8 cm. The complete chart area, including the empty squares around it, measures 5.08 × 5.08 cm.
Start with a piece of Aida approximately 15 × 15 cm for comfortable handling. You will trim it after stitching.
Oatmeal or light beige Aida gives the white icing a little contrast. White fabric also works, although the icing will be more subtle.
If you need to top up your supplies, DMC embroidery cotton is a useful starting point. For a project this small, check your thread leftovers before buying anything.
| Symbol | DMC number | Colour | Stitches |
|---|---|---|---|
| B | 433 | Medium Brown | 161 |
| W | B5200 | Snow White | 95 |
| G | 699 | Green | 40 |
| R | 321 | Red | 12 |
Printed swatches and screen colours are approximate. Choose thread by its DMC number.
The stitch counts show how much of each colour appears in the design. They are not measured thread requirements.
Overcast the outside edges of your Aida if they are fraying.
Fold the fabric gently in half both ways to find its centre. Mark the intersection with a loose temporary thread.
If using a hoop, position the fabric so it is evenly supported without stretching the weave.
The centre falls between columns 14 and 15, and between rows 14 and 15.
The chart numbers mark grid boundaries. Count individual squares from those boundaries, rather than treating the printed numbers as stitch symbols.
Choose a marked square near the centre, count its position carefully and match it to your fabric. Starting with the white icing near the centre gives you a useful reference for the brown pudding underneath.
Separate two strands from your six-strand embroidery cotton. Pull each strand out individually, then bring the two together and thread the needle.
Use a manageable length, approximately 40 cm. Longer lengths can become tangled and fuzzy.
Leave a short tail on the reverse and secure it beneath the backs of your first few stitches.
Bring the needle up at the lower-left corner of a fabric square and down at the upper-right corner.
Then bring it up at the lower-right corner and down at the upper-left corner to complete the X.
Keep the top diagonal facing the same direction throughout.
For a row of stitches in one colour, work the first diagonals across the row, then return to complete the crosses. Pull the thread gently into place without puckering the fabric.
Follow the white symbols to create the icing and its three drips. Every square marked W needs a stitch, even when your fabric is white.
Work the brown pudding beneath the icing, checking the stepped edges against the chart.
The shape is deliberately simple. There are no extra shading colours or separate outline stitches to add.
Stitch the green leaves and red berry cluster, counting their positions from the completed icing.
Finish each thread by passing it beneath several stitches on the back before trimming.
Avoid carrying red or green thread across empty background areas, where it might show through the fabric.
Compare the finished piece with the chart, looking for missing stitches or incomplete crosses.
Remove the hoop and temporary centre thread. If cleaning is needed, check the fabric and thread care instructions before washing.
Let the embroidery dry fully, then press gently from the reverse over a clean padded towel, using a suitable temperature and pressing cloth.
Trim the Aida to approximately 6 × 6 cm, keeping the pudding visually centred.
This leaves about 1 cm of fabric around the motif. Count the fabric threads as you cut to keep the edges straight.
For a lightly fringed finish, remove just one or two threads from each edge. Avoid pulling threads close to the embroidery.
Cut a rectangle of kraft cardstock 7.5 cm wide × 10 cm high.
Snip the top corners diagonally if you want a traditional luggage-tag shape.
Write your message on the back now, while the card is flat and easy to handle.
Position the Aida panel centrally across the width of the tag, leaving approximately 2.5 cm above it for the hanging hole.
Apply narrow strips of acid-free double-sided tape beneath the unstitched outer margins of the fabric. Keep adhesive away from the stitched motif.
Press the fabric margins into place without flattening the embroidery.
For another approach to mounting small stitched panels, see our cross stitch gift tag finishing ideas.
Punch a hole near the top centre of the card, leaving enough card above the hole to prevent tearing.
Thread through ribbon or cotton cord and tie it onto your parcel. A small hole reinforcement is useful if you want the tag to survive several Christmases.
Tie one to a jar of homemade biscuits, tuck one into a Christmas hamper or attach it to a fabric gift bag.
You could also mount the stitched square onto a blank greeting card. Keep the surrounding decoration simple so the little pudding remains the focus.
Our earlier stitched Christmas gift tag inspiration shows how small motifs can become reusable parcel decorations.
If you enjoy making gift toppers that double as ornaments, these felt Christmas stocking decorations are another lovely option for your handmade wrapping basket.
Christmas Pudding Chart – Right Click and Download.

Keep the icing stitched. Leaving it as bare fabric changes the texture and appearance of the design.
Check the fabric count. Smaller-count numbers produce larger stitches and a larger finished motif.
Use contrasting fabric. Oatmeal Aida helps the white icing stand out without needing an outline.
Print for readability. The chart does not need to print at actual stitch size. Fabric count determines the finished measurements.
Save the little leftovers. With just 12 red stitches in this design, even a modest length of leftover floss can be useful.
This is the sort of small Christmas make that earns its place in the scrap basket. A little fabric, a few familiar thread colours and a plain card tag become something worth keeping. Make one for a special parcel, or stitch a small batch so your Christmas wrapping has a handmade touch ready to go.