• Home
  • Suggest A Craft
  • DIY Newsletter

Craft Gossip

Independent craft blog since 2007

  • About CraftGossip
  • Our Network
    • Bath & Body Crafts
    • Candle Making Ideas
    • Crochet Ideas
    • Cross Stitch
    • Edible Crafts
    • Felting Patterns
    • Glass Art
    • Home & Garden Ideas
    • Indie Crafts
    • Jewelry Making
    • Kids Crafts
    • Knitting Patterns
    • Lesson Plans
    • Needlework
    • Party Ideas
    • Polymer Clay
    • Quilting Ideas
    • Recycled Crafts
    • Scrapbooking
    • Sewing Patterns
    • Card Making
    • DIY Weddings
    • Not Craft Ideas
  • Giveaways
  • Roundups
  • Store
  • Search

Bath salts and brown sugar scrub recipes

June 9, 2009 by jessica neaves

100_7528Bath salts & brown sugar scrub from WhiMSy love

Bath Salts: Put some Epsom salts in a small inexpensive drawstring muslin bag. Sprinkle in some lavender. Hang over tub faucet & let the mixture steep & dissolve while you soak. Aaahhh…

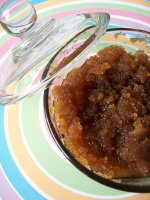
Brown Sugar Scrub: Combine 1 CUP of brown sugar, 1/2 cup vegetable or olive oil & 1 teaspoon vanilla in a jar or sturdy Ziploc bag. To use: While showering, apply scrub all over body to exfoliate. Rinse well. It can also be used to prep skin for a close shave: Exfoliate with scrub, rinse well, shave. Leaves skin moisturized. No need for lotions!

CAUTION: May cause tub/shower to become slippery!!

Read These Next

  • 10 DIY Bath And Body Recipes For When You Have A Headache
  • DIY Vanilla Body Scrub
«
»

Have you read?

DIY Metal Clay: How to Make Your Own Silver and Copper Clay at Home

If you’ve ever dreamed of turning powder into precious jewelry with your own two hands, metal clay is pure magic. Imagine taking fine silver or copper powder, mixing it with a binder, shaping it like clay, and then—poof!—after firing, you’re left with solid metal jewelry.

While you can buy ready-made packs of silver clay, they’re pricey. The good news? You can make your own at home, and it’s easier than you think. In this guide, I’ll walk you through how to make homemade silver and copper clay, tips for success, firing methods, and a handful of inspiring project ideas.

What Exactly Is Metal Clay?

Metal clay is a mix of fine metal powder (silver, copper, bronze, even gold), an organic binder, and water. It looks and feels like soft pottery clay, but once it’s dried and fired, the binder burns away and you’re left with solid metal.

Think of it as sculpting in clay with a shiny, wearable reward at the end. Unlike traditional silversmithing, there’s no sawing, soldering, or hammering required—just shape, dry, and fire.

Why Bother Making Your Own?

  • Cost savings: Store-bought silver clay can cost $50–$70 for a tiny 15g pack. Homemade clay is far more affordable, especially for bigger projects.

  • Creative control: You decide the texture, flexibility, and firing strength by adjusting your recipe.

  • Sustainability: Making your own lets you experiment with reclaimed metal powders or even recycled filings.

  • Satisfaction: There’s something deeply rewarding about making the medium itself, not just the jewelry.

Materials and Tools

Here’s your basic shopping list for DIY metal clay:

  • Metal powder: Fine silver, copper, or bronze powder. Look for mesh size 325 or finer for best results.

  • Binder: Options include CMC powder (carboxymethyl cellulose), methylcellulose, or gum tragacanth. These help the clay stick together until firing.

  • Distilled water: Keeps impurities out of your mix.

  • Optional additives:

    • Glycerin for longer working time.

    • Tools: Ceramic or glass mixing bowl, silicone spatula, airtight containers, plastic wrap, and a small kitchen scale.

Safety gear: Wear a mask when working with fine powders and gloves if you have sensitive skin.

Step-by-Step: How to Make DIY Metal Clay

Step 1: Weigh Your Ingredients

A good starting ratio is 90% metal powder and 10% binder by weight. If your clay feels crumbly later, you can adjust by adding more binder.

Step 2: Mix the Dry Ingredients

Combine your powder and binder thoroughly. Sift if needed to break up clumps.

Step 3: Add Water Gradually

Using a dropper or spoon, drizzle in distilled water while stirring. The mixture should come together into a soft dough.

Step 4: Knead and Test

On a non-stick surface, knead the mixture like bread dough until smooth. Press a small ball flat—if it cracks, add more water. If it sticks, dust with a touch more binder.

Step 5: Store Properly

Wrap the clay in cling film and place in an airtight container. Refrigerate if storing for more than a day. Homemade clay dries out faster than store-bought.

Working with DIY Metal Clay

  • Keep it damp: A spritz bottle of distilled water is your best friend.

  • Use release agents: Olive oil, balm, or cornstarch stops clay from sticking to stamps, molds, and tools.

  • Texture play: Press lace, leaves, or rubber stamps into your clay for beautiful natural patterns.

  • Dry thoroughly before firing: Air-dry 24 hours or place on a warming plate until bone-dry.

Firing Homemade Metal Clay

This is where the magic happens—your clay becomes solid metal.

Firing Silver Clay

  • Torch firing: Suitable for small pendants, charms, or earrings. Use a butane torch and heat until glowing orange (approx. 650–800°C). Hold for 2–5 minutes.

  • Kiln firing: Best for larger or thicker pieces. Fire at 800–900°C for 30–60 minutes.

Firing Copper or Bronze Clay

  • Needs a kiln and activated carbon (to prevent oxidation).

  • Place dried pieces in a stainless-steel container, bury in activated carbon, and fire at 900–950°C for 2–3 hours.

Tip: Always fire a test strip first to check shrinkage and strength.

Finishing Your Pieces

After firing, your pieces will look matte and a bit dull. That’s normal! To bring out the shine:

  1. Brush with a brass wire brush.

  2. Burnish with a steel tool for a glossy finish.

  3. Tumble-polish in steel shot for a mirror shine.

Optional: Add patinas (like liver of sulfur) to bring out textures and shadows.

Project Ideas for DIY Metal Clay

Here are a few creative starter projects:

  • Name pendants – Stamp children’s or grandchildren’s names into small silver bars.

  • Nature impressions – Press real leaves, flowers, or lace into clay for organic textures.

  • Fingerprint charms – Perfect keepsakes for new parents or grandparents.

  • Beads and buttons – Shape little rounds for custom jewelry or sewing projects.

  • Earring drops – Roll thin sheets and cut with mini cookie cutters.

Troubleshooting Common Problems

  • Cracking while drying: Clay too dry. Add more water and knead again.

  • Warping: Clay dried unevenly. Always dry pieces flat on a non-stick surface.

  • Weak after firing: Not enough binder or under-fired. Increase temperature slightly next time.

  • Excessive shrinkage: Too much binder or too little powder. Stick to the 90/10 ratio.

Safety Tips for DIY Metal Clay

  • Always wear a dust mask when handling powders.

  • Work in a well-ventilated space.

  • Don’t use kitchen tools for food after mixing clay. Keep them separate.

  • Let fired pieces cool completely before handling.

Where to Buy Supplies

  • Online jewelry suppliers (look for “fine silver powder” or “325 mesh copper powder”).

  • Pottery and ceramic shops (for binders and carbon).

  • Craft stores (some carry small packs of CMC powder).

Making your own silver or copper clay at home is part science experiment, part craft therapy. It saves money, gives you full control over your materials, and opens up a whole new world of jewelry making. Once you get the hang of it, you’ll find yourself experimenting with textures, firing techniques, and even combining metals for unique results.

Metal clay is one of those crafts that bridges the gap between ancient tradition and modern DIY. So grab your powders, roll up your sleeves, and let a little alchemy happen right at your kitchen table.

RSS More Articles

  • DIY Metal Clay: How to Make Your Own Silver and Copper Clay at Home
  • Book Review: 200 Japanese Cross Stitch Designs
  • Golden Aster and Butterfly Free Punch Needle Pattern from DMC – Nature-Inspired Punch Needle Bliss
  • 35 Spooktacular Halloween Pillows You Can Sew Today
  • Free Crochet Pattern – Dot Baby Blanket
  • How to Make Creatine Gummies at Home – A Fun and Tasty DIY Recipe
  • 19 FREE Disney Princess Back to School Coloring Pages
  • How to Make Handmade Pottery Ceramic Wind Chimes
  • My Honest Take on Sewing the Nina Jumpsuit from Creativebug
  • 12 Road Trip Travel Scrapbook Layout Ideas

Pick Your Blog

  • Sewing
  • Knitting
  • Quilting
  • Crochet
  • Home & Garden
  • Recycled Crafts
  • Scrapbooking
  • Card Making
  • Polymer Clay
  • Cross-Stitch
  • Edible Crafts
  • Felting
  • Glass Art
  • Indie Crafts
  • Kids Crafts
  • Jewelry Making
  • Lesson Plans
  • Needlework
  • Bath & Body
  • Party Ideas
  • Candle Making
  • DIY Weddings
  • Not Craft
  • Free Craft Projects

Copyright © 2025 · CraftGossip | Start Here | Contact Us | Link to Us | Your Editors | Privacy and affiliate policy