• Home
  • Suggest A Craft
  • DIY Newsletter

Craft Gossip

Independent craft blog since 2007

  • About CraftGossip
  • Our Network
    • Bath & Body Crafts
    • Candle Making Ideas
    • Crochet Ideas
    • Cross Stitch
    • Edible Crafts
    • Felting Patterns
    • Glass Art
    • Home & Garden Ideas
    • Indie Crafts
    • Jewelry Making
    • Kids Crafts
    • Knitting Patterns
    • Lesson Plans
    • Needlework
    • Party Ideas
    • Polymer Clay
    • Quilting Ideas
    • Recycled Crafts
    • Scrapbooking
    • Sewing Patterns
    • Card Making
    • DIY Weddings
    • Not Craft Ideas
  • Giveaways
  • Roundups
  • Store
  • Search

Basic lotion recipe

July 3, 2009 by jessica neaves

Basic Lotion Recipe
written up by Jennifer Adler M.S., C.N.
from Conscious Choice

In 1962, Rachel Carson wrote in her groundbreaking book, Silent Spring, “For the first time in the history of the world, every human being is now subject to contact with dangerous chemicals, from the moment of conception until death.” We are exposed to synthetic chemicals in foods as well as in skin care products. The following lotion recipe comes from Jennifer Sundstrom of Natural Resource Herbals and contains high quality safe ingredients that can make winter skin glow, naturally.

1 heaping tablespoon grated beeswax
2 ounces pomace olive oil, or infused oil (extra virgin olive oil will work, but may leave your lotion smelling more like your salad dressing.)
1 teaspoon coconut oil (optional)
2 tablespoons water
1–2 drops essential oils (optional)

Melt beeswax in a double boiler. I recommend a glass measuring cup in a small pan to make pouring your finished product easier.

Add oil(s) and heat until everything liquefies. Heating olive oil promotes rancidity, so only heat as much as necessary to re-melt the beeswax.

Remove from heat. Using a hand-held stick/immersion blender, begin whipping the oil/beeswax mixture. Slowly drizzle in the water. Continue mixing for another minute or so. The lotion will be quite runny and hot at this point and will thicken over time as it cools. As your lotion cools, give it a whiz with your hand blender every 10–15 minutes until fully cool.

Pack lotion into the jar of your choice. Amber glass jars are ideal.

If you prefer a heavier cream-style, add more beeswax, or substitute coconut oil for the olive oil. If you prefer a more liquid lotion, add less beeswax.

Recipe can be doubled/tripled/quadrupled.

Optional: If you use essential oils, add 1–2 drops when adding the water.

Olive oil is highly regarded for its ability to hold moisture on the skin. It has a very long shelf life if not exposed to light or heat. For a high quality product, freshness and a lengthy shelf life, only buy olive oil in tins or opaque containers. To infuse olive oil: Place fresh cut-up plant material in a jar and cover with pomace olive oil. Store in a dark place for 6 weeks. Strain plant material and your oil is ready! Herbal possibilities for infused oil: lavender, rosemary, elderflower, rose petal, or your favorite plant ally.
Read These Next

  • 40 Sensory Activities For Kids For All Seasons
  • Why You Can't Claim Your Product Cures Eczema,…
«
»

Have you read?

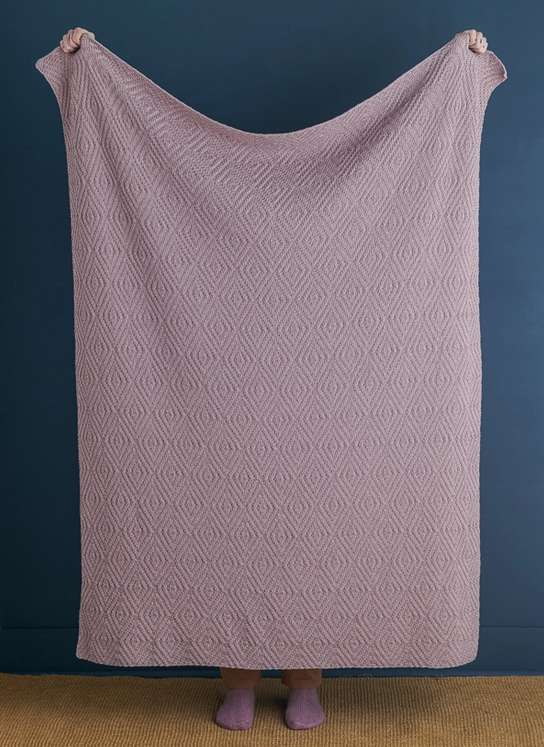
Knit a Blanket with the Texture of a Ceiling

Knitwear designers can get inspiration from almost anything when it comes to re-creating a color scheme, an image or a texture in stitches. Sometimes the inspiration isn’t always obvious in the finished project, but sometimes it’s more literal. 

That’s the way it is with the Tin Ceiling Blanket from Purl Soho. Not just because the inspiration is in the name, but if you’ve ever seen one of these old ceilings you can see that the design of the blanket is quite similar to the pattern of the tin tiles. 

This is also a good example of the idea that you don’t have to use fancy stitch patterns or lots of color to make a big impact with your knits. This single-color blanket (designed by Gianna Mueller and inspired by a washcloth and towel set designed by Sandi Rosner) is made completely with knits and purls, other than slipped stitches at the beginning of rows to make neater edges. 

The pattern is written out row by row, but there’s also a chart, which means this project is a great opportunity to practice reading a chart where you can check your work against the written pattern if you need to. 

It comes in two sizes, a crib blanket and a throw. The yarn used in the sample is an organic cotton sold by the cone, which is a great way to get a large quantity of yarn and have fewer ends to weave in. In fact, you can knit either size of the blanket with just one cone of yarn, which isn’t inexpensive but makes you a great, sturdy, heirloom quality but still washable blanket you’ll use for years to come. (Of course you can use any sport weight yarn you like to make this blanket.)

Check out all the details and grab the free pattern from Purl Soho. 

[Photo: Purl Soho]

RSS More Articles

  • Knit a Blanket with the Texture of a Ceiling
  • 20 FREE Camping Quotes Die Cut and Printable Files
  • Book Review: Super Fun Math Games for Kids
  • IWAS Upcycled Drinking Glasses
  • Free Crochet Strawberry Ribbon Scrunchie Pattern
  • DIY Metal Clay: How to Make Your Own Silver and Copper Clay at Home
  • Book Review: 200 Japanese Cross Stitch Designs
  • Golden Aster and Butterfly Free Punch Needle Pattern from DMC – Nature-Inspired Punch Needle Bliss
  • 35 Spooktacular Halloween Pillows You Can Sew Today
  • Free Crochet Pattern – Dot Baby Blanket

Pick Your Blog

  • Sewing
  • Knitting
  • Quilting
  • Crochet
  • Home & Garden
  • Recycled Crafts
  • Scrapbooking
  • Card Making
  • Polymer Clay
  • Cross-Stitch
  • Edible Crafts
  • Felting
  • Glass Art
  • Indie Crafts
  • Kids Crafts
  • Jewelry Making
  • Lesson Plans
  • Needlework
  • Bath & Body
  • Party Ideas
  • Candle Making
  • DIY Weddings
  • Not Craft
  • Free Craft Projects

Copyright © 2025 · CraftGossip | Start Here | Contact Us | Link to Us | Your Editors | Privacy and affiliate policy