• Home
  • Suggest A Craft
  • DIY Newsletter

Craft Gossip

The largest independent craft review site since 2007

  • About CraftGossip
  • Our Network
    • Bath & Body Crafts
    • Candle Making Ideas
    • Crochet Ideas
    • Cross Stitch
    • Edible Crafts
    • Felting Patterns
    • Glass Art
    • Home & Garden Ideas
    • Indie Crafts
    • Jewelry Making
    • Kids Crafts
    • Knitting Patterns
    • Lesson Plans
    • Needlework
    • Party Ideas
    • Polymer Clay
    • Quilting Ideas
    • Recycled Crafts
    • Scrapbooking
    • Sewing Patterns
    • Card Making
    • DIY Weddings
    • Not Craft Ideas
  • Giveaways
  • Roundups
  • Store
  • Search

Artist Profile: Bronwen Heilman – Ghost Cow

August 28, 2009 by Cathi Milligan

tikis
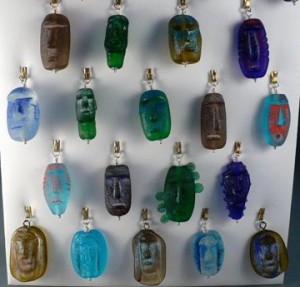
A woman of many talents. Glass…music…metal…mom…creative dynamo! Her glass work is an inspiration to so many. And with good reason. It rocks!!! So allow me to introduce you some of the many facets of her glass work, with using bottle glass as her newest adventure. Check out the tikis…so cool. I have a tiki collection so I have a sweet spot in my heart for tikis. And these are made with bottle glass. So cool. Wait, I said that already. But it’s so true. Recycled glass…go Bronwen! And eco friendly! Check out her web site www.ghostcow.com. You can find out more about Bronwen, her glass, shows and of course her band, Ghost Cow. I’ve seen them play and they rock too!

Bronwen is based in Tucson, AZ, but does make her way around for shows and classes. Her next class is at Blue Moon in Austin. She’s going to teach you about enamels. Check out this other piece…n570264301_1103399_7773

This is made in multiple stages with glass painting and fusing. Just awesome. Can I gush about her work enough? It’s just that it’s so unique and cutting edge. And the beads she makes with this painting technique and then doing roll-ups are amazing! Needless to say, if you get the chance to check out her work or one of her classes you really need to. And her band too! One last piece of hers here to swoon over. From her beach glass series. Simple beauty.

n570264301_745807_7847

Read These Next

  • 20 Moo Cows You Can Crochet
  • Fun Cow Activities for Kids
«
»

Have you read?

The Secret to Perfect Topstitching (No More Frayed Thread!)

The Secret to Perfect Topstitching (No More Frayed Thread!)

I’ll admit it — I used to hate topstitching. Every time I tried, it looked like a toddler had gone wild with a crayon. My lines were crooked, my thread kept fraying or snapping mid-stitch, and I spent more time hunched over with a seam ripper than actually sewing anything. It was frustrating, messy, and honestly, it made me avoid finishing details altogether.

Then one weekend, while visiting my grandmother — a retired tailor with decades of wisdom stitched into every piece of clothing she’s ever made — I casually mentioned my topstitching disaster. She gave me that knowing smile (the kind that says, “Ah yes, I remember being there too”), and invited me to her sewing room.

That afternoon changed everything.

She showed me how to slow down, how to stabilize my fabric properly, and which threads actually hold up under pressure. She introduced me to her favorite topstitching needle, adjusted my tension, and even shared the trick of using a walking foot for those pesky layers. Watching her sew was like witnessing magic in motion. The stitches glided effortlessly, straight and even, and suddenly I realized — this wasn’t about perfection. It was about preparation, patience, and practice.

Now? Topstitching is one of my favorite finishing touches. It’s no longer a source of stress — it’s a moment of pride. And every time I finish a piece with a crisp, clean line, I think of my grandmother and smile.

Why Your Topstitching Sucks (And How to Fix It)

1. You’re Using the Wrong Thread

That all-purpose thread? It’s like trying to paint a masterpiece with sidewalk chalk. For topstitching that pops:

  • Aurifil 40wt – My go-to for invisible yet strong stitching
  • Gütermann topstitching thread – That beautiful sheen makes my jeans look store-bought
  • Coats Machine Quilting thread – When I want bold, noticeable stitches

Pro tip: I keep all three in my topstitching kit and match the thread to the project’s personality.

2. Your Needle is Sabotaging You

After ruining countless projects, I learned:

  • Topstitching needles have a bigger eye so the thread doesn’t fray
  • Size 90/14 is my sweet spot for most fabrics
  • I change needles every two major projects (cheap insurance!)

Fun experiment: Try sewing with a fresh needle vs. one you’ve used for 10 hours. The difference will shock you.

3. You’re Ignoring the Little Things

Here’s my pre-topstitching ritual:

  1. Thread conditioner – I rub my thread through beeswax for tough fabrics
  2. Tension test strip – I always sew on scraps first (saves so much frustration)
  3. Guide tape – Painter’s tape is my secret for perfectly straight lines

True confession: I used to skip these steps thinking they wasted time. Now I know they actually save hours of rework.

When Disaster Strikes (Quick Fixes)

Frayed thread?

  • Try a thread net or conditioner
  • Shorten your stitch length slightly
  • Switch to a topstitching needle

Uneven stitches?

  • Clean your feed dogs (lint is the silent killer)
  • Use consistent foot pressure
  • Try a walking foot for tricky fabrics

My favorite trick: When topstitching denim, I put tracing paper underneath. It stabilizes the fabric and just tears away afterward – total game changer!

The Real Secret

After years of trial and error, here’s what I’ve learned: perfect topstitching isn’t about having the steadiest hand. It’s about setting up your machine properly before you even start. These days, I actually enjoy topstitching (crazy, right?). What used to be my nemesis is now one of my favorite techniques.


RSS More Articles

  • The Secret to Perfect Topstitching (No More Frayed Thread!)
  • Flower Cross Stitch Kits
  • Etsy Spotlight – Girls A-Line Dress Sewing Pattern
  • 4 FREE Mother’s Day Scrapbook Titles
  • Duality Blanket Crochet Kit – Beginner Crochet Blanket kit
  • How to Build Your Own Stylish Patio Cooler – A Perfect Summer DIY
  • Free Sewing Pattern – Sew A Flattering and Versatile Tiered Skirt Pattern
  • Spring Outdoor Activities for Kids
  • Time Flies — And Sometimes It Has Wings Made of Vintage Paper and Buttons
  • 7 Unexpected Ways to Customize The Lowink Blanket (Beyond the Kit!

Pick Your Blog

  • Sewing
  • Knitting
  • Quilting
  • Crochet
  • Home & Garden
  • Recycled Crafts
  • Scrapbooking
  • Card Making
  • Polymer Clay
  • Cross-Stitch
  • Edible Crafts
  • Felting
  • Glass Art
  • Indie Crafts
  • Kids Crafts
  • Jewelry Making
  • Lesson Plans
  • Needlework
  • Bath & Body
  • Party Ideas
  • Candle Making
  • DIY Weddings
  • Not Craft
  • Free Craft Projects

Copyright © 2025 · CraftGossip | Start Here | Contact Us | Link to Us | Your Editors | Privacy and affiliate policy