• Home
  • Suggest A Craft
  • DIY Newsletter

Craft Gossip

The largest independent craft review site since 2007

  • About CraftGossip
  • Our Network
    • Bath & Body Crafts
    • Candle Making Ideas
    • Crochet Ideas
    • Cross Stitch
    • Edible Crafts
    • Felting Patterns
    • Glass Art
    • Home & Garden Ideas
    • Indie Crafts
    • Jewelry Making
    • Kids Crafts
    • Knitting Patterns
    • Lesson Plans
    • Needlework
    • Party Ideas
    • Polymer Clay
    • Quilting Ideas
    • Recycled Crafts
    • Scrapbooking
    • Sewing Patterns
    • Card Making
    • DIY Weddings
    • Not Craft Ideas
  • Giveaways
  • Roundups
  • Store
  • Search

Art Glass Tiles…

January 13, 2010 by Cathi Milligan

P1150370So I’ve got a bathroom remodel in progress. Pretty exciting stuff here in the old homestead. This project is long overdue and is my first adventure in creating art tiles. Most of the tub area will be done with white subway tiles but I fused some really lovely glass in greens and blues and dichroic glass too. I fused larger sized tiles about 8″x 8″ and then had them cut for me into 1″ x 1″, 1″ x 2″ and 2″ x2″ pieces. They were cut using a waterjet cutter, which uses water to cut perfect pieces. And they looked amazing. A waterjet cutter can cut pretty much any kind of material and in just about any shape. Super cool machine. All of the tiles were then fire polished to round up the edges. They look great.

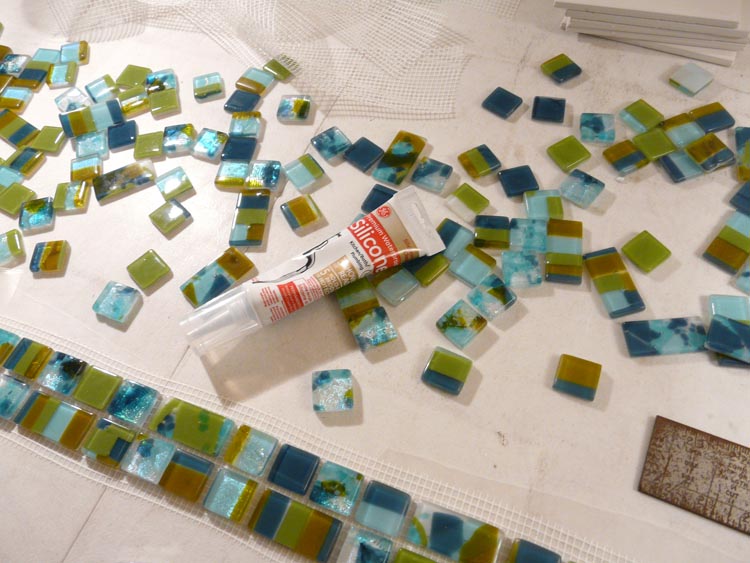
To get them ready for installation I ordered some mesh from Maryland Mosaics and used silicone caulk/glue to glue the pieces to the mesh. This will make installation a lot easier. The tiles were layed out as I’d like to see them on the walls and the installer will then cut them in 6″ or so lengths to adhere them to the wall. I’ll post pictures of the finished tile job as soon as possible. It’s a very exciting project. Can’t wait for my sink to be installed, yes I made that too…

Read These Next

  • Reviving Vintage Cutter Quilts: 35 Creative…
  • DIY Money Saving Bathroom And Kitchen Cleaners
«
»

Have you read?

Stack and Whack Four Patch Quilt Tutorial – A Beginner-Friendly Quilting Method You’ll Love

If you’re looking for a fast, fun, and beginner-friendly quilt project, Leah Day’s Stack and Whack Four Patch Quilt Tutorial is an absolute must-see. Whether you’re new to quilting or just craving a fresh project that showcases beautiful fabric combinations with minimal fuss, this clever method ticks all the boxes.

We took a deep dive into Leah’s tutorial to see just how effective this technique is—and spoiler alert—it’s a game-changer for quilters of all skill levels.

What Is a Stack and Whack Four Patch Quilt?
The “stack and whack” method is a time-saving piecing technique that allows you to cut and sew multiple quilt blocks quickly by layering fabrics, slicing them together, and mixing the pieces to create striking, high-contrast four-patch blocks. It’s the perfect fusion of efficiency and creativity.

In Leah Day’s tutorial, she breaks down the method step by step, showing how to create 48 unique four-patch blocks with just 8 fat quarters. This makes it an excellent scrap-busting project, too!

Why We Love Leah Day’s Tutorial
1. Clear Instructions for Beginners
Leah is known for her approachable teaching style, and this tutorial is no exception. Her detailed guidance makes the process feel simple and doable, even if you’re new to rotary cutting or haven’t made a quilt before. The tutorial includes both written instructions and a video—ideal for visual learners.

2. Great for Fat Quarters and Stash Busting
If your fabric stash is overflowing with fat quarters or random yardage, this project will help you use those prints in a fresh, dynamic way. The stack-and-whack method allows for unexpected fabric combinations, making every quilt unique.

3. Fast Piecing = Quicker Finishes
One of the biggest perks of the four-patch stack and whack method is how fast it is. Leah’s process allows you to make dozens of blocks quickly, which means you can finish a quilt top in a weekend—yes, even if you’re a casual or part-time quilter.

Key Takeaways from the Stack and Whack Four Patch Tutorial
Perfect for beginners: The technique doesn’t require complex cutting or piecing, and there’s lots of room for creativity.

Efficient block creation: Stack and slice method saves time while maximizing fabric use.

Quilt top layout tips included: Leah offers great advice on arranging your blocks to create contrast and balance in your design.

Optional sashing guidance: Want to add sashing or borders? Leah’s blog includes layout ideas that take your quilt to the next level.

Includes a downloadable pattern: There’s a printable guide for those who prefer step-by-step instructions in hand.

 10 Free Stack-N-Whack Quilt Patterns

Tutorial: Easy peasy pieced blocks

Stack and Whack worksheet


RSS More Articles

  • Eco-Craft Fun: 25+ Sustainable Activities to Teach Kids About Going Green
  • Stack and Whack Four Patch Quilt Tutorial – A Beginner-Friendly Quilting Method You’ll Love
  • 12+ Mermaid Cards to Celebrate MerMay
  • Embroidery Patterns Stabilizers Wildflowers
  • Book Review: Off to the Nursery
  • Add a Little Lace to Your Knitting Patterns
  • How To Hide Ugly Outdoor Hose Pipes
  • Let’s Make the Lowink Beginners Blanket TOGETHER
  • The Secret to Perfect Topstitching (No More Frayed Thread!)
  • Etsy Spotlight – Girls A-Line Dress Sewing Pattern

Pick Your Blog

  • Sewing
  • Knitting
  • Quilting
  • Crochet
  • Home & Garden
  • Recycled Crafts
  • Scrapbooking
  • Card Making
  • Polymer Clay
  • Cross-Stitch
  • Edible Crafts
  • Felting
  • Glass Art
  • Indie Crafts
  • Kids Crafts
  • Jewelry Making
  • Lesson Plans
  • Needlework
  • Bath & Body
  • Party Ideas
  • Candle Making
  • DIY Weddings
  • Not Craft
  • Free Craft Projects

Copyright © 2025 · CraftGossip | Start Here | Contact Us | Link to Us | Your Editors | Privacy and affiliate policy