• Home
  • Suggest A Craft
  • DIY Newsletter

Craft Gossip

The largest independent craft review site since 2007

  • About CraftGossip
  • Our Network
    • Bath & Body Crafts
    • Candle Making Ideas
    • Crochet Ideas
    • Cross Stitch
    • Edible Crafts
    • Felting Patterns
    • Glass Art
    • Home & Garden Ideas
    • Indie Crafts
    • Jewelry Making
    • Kids Crafts
    • Knitting Patterns
    • Lesson Plans
    • Needlework
    • Party Ideas
    • Polymer Clay
    • Quilting Ideas
    • Recycled Crafts
    • Scrapbooking
    • Sewing Patterns
    • Card Making
    • DIY Weddings
    • Not Craft Ideas
  • Giveaways
  • Roundups
  • Store
  • Search

12 Classic Car Party Food Boxes – GM Collection

July 12, 2020 by Shellie Wilson

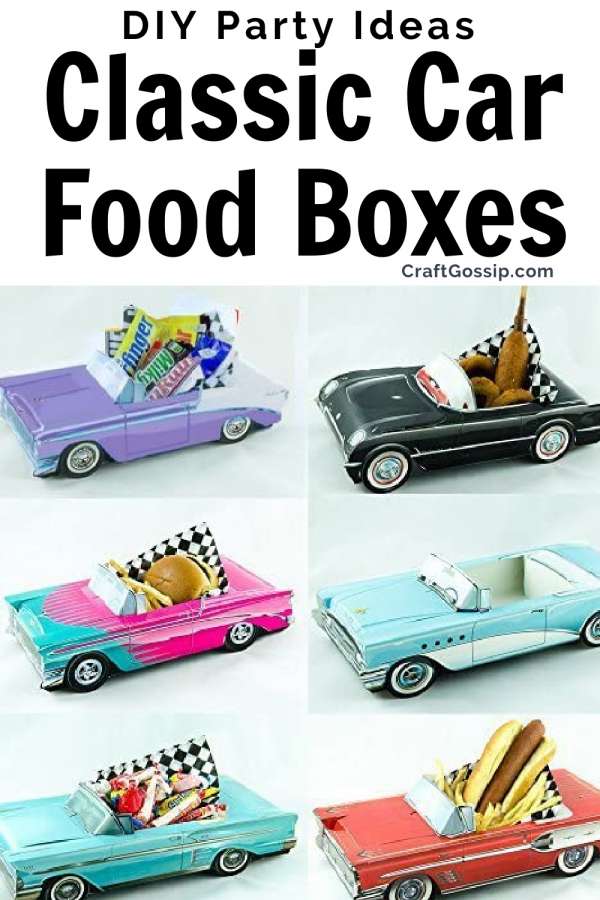
Oh my gosh, how amazing are these 50s styled food party boxes, I would love to have my Friday night dinner out of these even if it wasn’t a party night! So much fun and such an easy way to add a theme to your party meal.  

These food boxes can definitely add a fun and unique touch to your dinner or party. The 1950s theme is a timeless classic and will bring a sense of nostalgia to your event. Serving food in boxes or trays is a practical solution, especially if you’re having a large gathering. It’s a great way to provide your guests with individual portions of food and make sure everyone gets a taste of everything without the mess. 

The classic car theme is perfect for car enthusiasts, and it’s a great way to include a fun and playful element in your party. Don’t forget to add some vintage soda bottles and classic car napkins to complete the theme!

Pair these Classic car food boxes with some Classic car   Party decorations, including garlands and cupcake toppers.

The ultimate GM Classic Collection in a 12 Car Set

  • Cardboard Replica of 1950’s Classic Cars Make Great Addition to Party or Event
  • Free Waxed Paper Food Liners Included in Every Set for Every Car (Food/Candy is not included)
  • Can be used as Food Container, Candy holder, Centerpiece, Party Favors
  • Easy to Assemble, They Come in One Piece with Easy Instructions on the back of each Car

You can purchase this adorable classic car 50’s food box here. 

A fun party theme at the moment is to celebrate the theme of the year you are turning, for example, turning 50. then have a 50″s themed birthday party. In your 40’s? then plan a DIY roaring 40’s party.

Celebrating the year you were born is a unique and fun way to commemorate your birthday. And a decade-themed party is a great way to bring back memories and celebrate the era that had a significant impact on your life.

You can go all out with the theme by incorporating vintage decor, music, food, and fashion. You can also ask your guests to dress up in the style of the decade and make it a costume party! This can add a fun element to the celebration and make for some great photo opportunities. Overall, it’s a great way to have a memorable and personalized birthday celebration.

Read These Next

  • 23 Delicious Meatball Dinner Ideas
  • Hosting a Charming Vintage Tea Party: Ideal for…
«
»

Have you read?

Make Your Cross Stitch into an Iron On Patch

A while back I made a little rainbow cross stitch pattern and I wasn’t sure what I wanted to do with it, so I turned it into a patch. My idea was that it could be used on a jacket or backpack, or you could add a pin to the back and wear it temporarily on a shirt or elsewhere. 

But what if you want to make your design more permanent? Is it possible to turn a piece of cross stitch into an iron-on design?

It turns out yes, it is, and Sirious Stitches has done it so I didn’t have to try to figure it out on my own. 

The way they did it was by using HeatnBond, an iron-on adhesive that attaches fabrics without sewing. There was still sewing involved to finish the edges of the cross stitch fabric and make it look like a purchased patch. The post shows how to do this by hand or with your sewing machine. (I just did blanket stitch edging on mine, which doesn’t look like a “real” patch but is also a lot faster.)

Once you have the patch prepared it’s a pretty easy matter of using the fusible adhesive to the back of the patch so you can then iron it onto whatever jacket, pair of jeans, bag or whatever else you might want to add it to. 

I guess I’m a little paranoid about the washability of cross stitch projects, though you could hand wash anything with an iron-on cross stitch patch as you might need to with a purchased iron-on patch, anyway. But this does look really cool and is a great option if you know you want to permanently add a cross stitch patch to a garment of bag. 

Get the full tutorial over at Sirious Stitches. Would you add an iron-on cross stitch patch to something? I’d love to hear what you would use this technique for!

[Photo: Sirious Stitches]

RSS More Articles

  • Make Your Cross Stitch into an Iron On Patch
  • How to Make a Trendy Capybara Card
  • DIY Valentine Shabby Chic Bookmarks: A Creative and Heartfelt Gift Idea
  • Stitch Stars: Taylor: Over 20 unofficial embroidery patterns for stitchy superfans
  • Bee Themed Mini Scrapbook Album
  • Fun Tank Top Knitting Patterns
  • Books to Get Ready for Back to School
  • Just Feel Festive Shawl crochet pattern by QuirkyMondayCrafts
  • Cozy Up Your Holidays with This Stunning Christmas Blanket!
  • 5 Must-Know Secrets to Turning Your Suburban Home into a Profitable, Sustainable Homestead

Pick Your Blog

  • Sewing
  • Knitting
  • Quilting
  • Crochet
  • Home & Garden
  • Recycled Crafts
  • Scrapbooking
  • Card Making
  • Polymer Clay
  • Cross-Stitch
  • Edible Crafts
  • Felting
  • Glass Art
  • Indie Crafts
  • Kids Crafts
  • Jewelry Making
  • Lesson Plans
  • Needlework
  • Bath & Body
  • Party Ideas
  • Candle Making
  • DIY Weddings
  • Not Craft
  • Free Craft Projects

Copyright © 2025 · CraftGossip | Start Here | Contact Us | Link to Us | Your Editors | Privacy and affiliate policy